How to Create a Complete Short Film with AI: A Step-by-Step Guide
To create a complete short film with AI, you must follow a structured workflow from keyframes to final assembly. This guide provides a step-by-step process for managing the cost and time involved in AI video production. We cover the essential techniques used by AI filmmaker Austin Zartman to take a short film from concept to a viewable rough cut. Following this framework is the most effective way to create a coherent final product and bring your creative vision to life using AI video tools.
Pre-Production: The Foundation to Create a Complete Short Film with AI
The most critical phase to create a complete short film with AI is pre-production, where you generate consistent static keyframes. The subsequent AI video generation stage is more expensive in credits and time, so getting the static images right first saves considerable resources. This foundational work ensures your character designs, backgrounds, and lighting remain consistent from shot to shot. Any visual inconsistencies in the keyframes will be amplified once animated.
AI filmmaker Austin Zartman, creator of the AI series ASHES, emphasizes this preparatory phase. "The reason that we spend so much time on that process, making sure that images are consistent and that all of the small details are right, is that the video generation stage is significantly more expensive... and it's significantly more time consuming," Zartman states. By perfecting your keyframes—the still images that define the beginning and end of a shot—you ensure the core visual elements of your film are locked in. Investing time in this image stage provides a stable foundation and prevents wasted resources during the animation phase. The benefits of this focus include:
- Cost Savings: Avoids expensive re-renders of video clips.
- Time Efficiency: Prevents delays caused by correcting animated errors.
- Creative Control: Ensures the core visual narrative is locked in before animation. This methodical approach is central to making a coherent and visually stable short film with AI.
Writing Prompts to Create a Complete Short Film with AI
The best practice for writing AI video prompts is to keep them simple. A good rule is one action and, at most, one camera movement per prompt. When you create a film with AI, complex prompts with multiple actions often confuse the model and lead to poor or unpredictable results. This discipline is fundamental to building a coherent scene.
Breaking down complex scenes is a key technique. According to Austin Zartman, even if a single sentence in your script describes several actions, it should be divided into multiple shots for the AI. "If that includes three actions, it will benefit you to separate that out into three separate shots," he advises. For example, a script line like "The character walks to the table, picks up a cup, and takes a drink" should not be a single prompt. Instead, it should be treated as three distinct shots:
- A shot of the character walking to the table.
- A shot of the character picking up the cup.
- A shot of the character taking a drink.
This approach gives the AI a clear, manageable instruction for each clip, resulting in higher quality and more controllable outputs. For anyone looking to create a complete short film with AI, mastering simple, direct prompts is a core skill. It provides granular control over the pacing and action in your final edit.
Turning Images into Video: The Render Stage
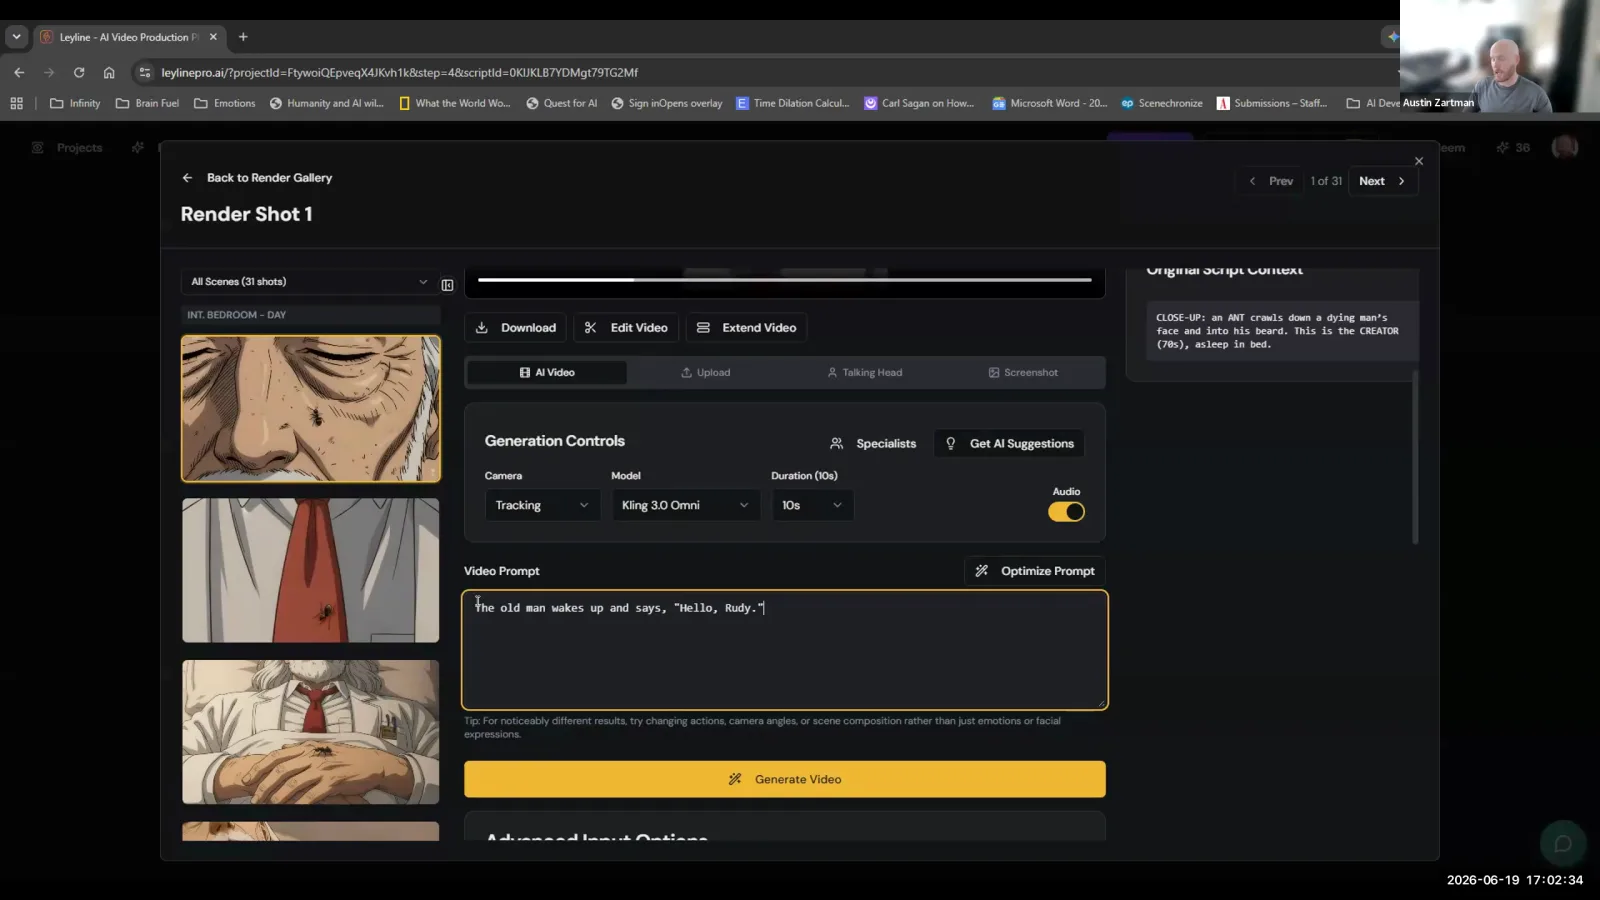
The render stage turns your finalized static keyframes into moving AI video clips. In this stage, you select an AI video model to animate your keyframes, turning them into the building blocks of your short film.
Once you are satisfied with your keyframes, the workflow transitions from image generation to video generation. "Once you've generated all of the keyframes, you'll push the changes to the render stage," Zartman explains. "The render stage is where we will start to turn those static keyframes into moving shots." This is where you choose the specific AI model to perform the animation. Different models offer varying capabilities. For instance, Zartman provides an overview of several options, noting that "Seedance 2.0 right now is considered the best model." Other models like Cling or VO have their own strengths, costs, and use cases. The choice of model directly impacts the final look, quality, and credit cost of your complete short. You must weigh these factors—cost, style, and capability—when selecting the right tool for each shot.
Generating Dialogue and Lip-Sync with AI
Advanced AI video models can generate clips that include spoken dialogue and synchronized lip movements directly from a text prompt. This feature is a powerful tool for creating dialogue-driven scenes, as it allows characters on screen to appear to be speaking lines from your script. This capability removes the need for complex post-production visual effects for many dialogue scenes.
Austin Zartman explains that you can include the dialogue directly in the prompt. For example, a prompt could read: "The old man wakes up and says, 'Hello, Ruby.'" When processed by a capable model like Seedance, VO, or Cling 3.0, the resulting AI video will not only show the action but also animate the character's mouth to match the specified words. Zartman notes that generating a clip with lip-sync can take around five minutes. This step integrates audio and video creation, streamlining the production of dialogue-driven scenes for your short film.
Refining Video with Negative Prompts
You can refine and control the AI's video output by using negative prompts. A negative prompt is an instruction that tells the AI video model what elements, qualities, or actions to specifically avoid including in the final video clip.
This technique offers a powerful layer of control over the generation process. "The other thing that I want to talk about is negative prompting," Zartman mentions, pointing to a dedicated section for it in the quality settings. If you find your video generations frequently include unwanted artifacts, you can add descriptive terms to the negative prompt field. This helps guide the AI toward a cleaner, more professional result. Common negative prompts include:
- blurry, grainy, low-resolution
- deformed, mutated, disfigured
- watermark, text, signature
- extra limbs, bad anatomy, poorly drawn hands
- flickering, jittery motion Using negative prompts effectively is a key skill for troubleshooting and improving the quality of AI-generated footage. It gives you the control needed to create a short film that meets a higher quality standard.
Assembling Your Clips into a Rough Cut
To assemble a rough cut of your short film, you push all rendered AI video clips to a timeline feature that automatically stitches them together in sequence. This function creates a preview of your episode or film and is the final generation step before moving to a professional editor.
This final step in the workflow provides a holistic view of your project. "Once you're essentially done with the process, you push this to the timeline phase. And this is where it'll start to stitch together all of your clips that you've generated," says Zartman. It is important to understand the purpose of this tool. It is not a full-featured professional video editor. Its primary function is to serve as a "quick and easy preview and rough cut." This allows you to see if any shots are missing or if the sequence flows correctly. This preview confirms you have all the necessary shots to create a complete short film. For a polished, professional film, you must export the generated clips and use external software for advanced editing, color grading, sound design, and finishing.
Frequently asked questions
What is the primary goal of the process used to create a complete short film with AI?
According to Austin Zartman, the goal is to equip you with the tools and knowledge necessary to create a complete rough cut of your first AI-generated episode. The focus is on getting a story from script to a viewable first draft entirely within the AI workflow.
Why should a single script action be split into multiple shots?
Splitting a sentence with multiple actions into separate, single-action shots is beneficial because it simplifies the task for the AI. This leads to more predictable and higher-quality video generations, as the model only has to focus on one specific action and camera move at a time.
Which AI video model is currently considered the best?
In his masterclass, AI filmmaker Austin Zartman states that, at the moment, "Seedance 2.0 right now is considered the best model" for generating high-quality video clips from text and image prompts.
Can I use the built-in timeline for my final edit?
No, the timeline feature is designed for previewing your generated shots and assembling a rough cut. It is not intended for final, professional editing. For a polished film, you should export the clips and use dedicated video editing software for tasks like color correction and sound mixing.
Keep learning
This guide is part of the AI Video Generation and Rough Cuts masterclass lesson.
Related guides:
Comments
Sign in with your Leyline account to join the conversation.