Visual Storytelling & Image Generation
Cohort 1, Session 3 — taught by Austin Zartman, creator of the AI short-film series ASHES.
To make a film with AI, you first translate your script into a visual plan. This involves breaking the story into specific shots, blocking character positions on a floor plan, and applying directing fundamentals like the 180-degree rule. You then establish a consistent visual style and generate reusable character assets. Finally, you create the keyframe images for each shot, which become the foundation for your animated scenes.
What you will learn
- Understand the director's process of translating a script into visual shots.
- Learn how to block scenes and plan camera coverage using a floor plan.
- Apply core filmmaking principles like the 180-degree rule to ensure visual continuity.
- Develop a consistent visual style and create a 'style tag' for AI models.
- Create a reference package of core assets, including character sheets and sprite sheets.
- Generate and edit keyframe images for an episode using the Layline platform.
Breaking Down a Script for Directing
Before generating any images, you must translate your script into a concrete visual plan by breaking it down into individual shots and mapping out camera placements.
Step 1. Read the script several times without making notes to absorb the story and character relationships.
Step 2. Identify the key relationships in each scene: between characters, characters and the environment, and a character with themselves.
Step 3. Create a top-down floor plan of the location, either by drawing or using a tool like Shot Lister.
This helps you visualize the space your characters will move through.
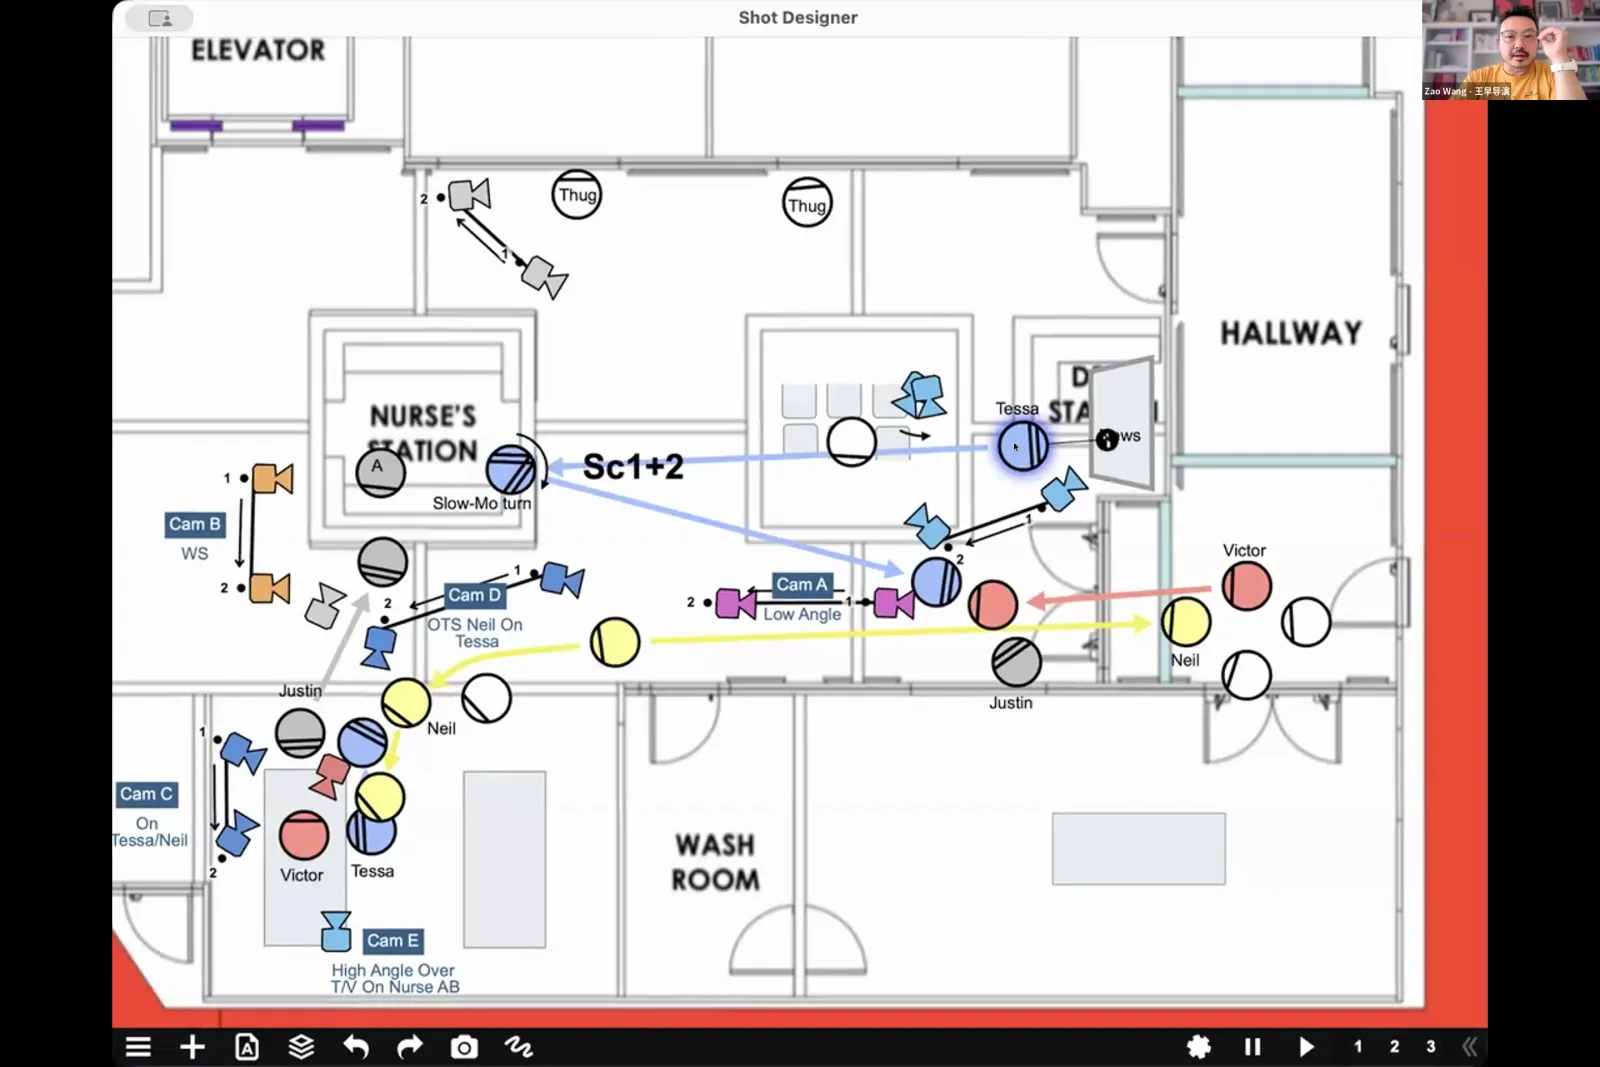
A top-down floor plan in Shot Designer shows character blocking and camera positions for a scene.
Step 4. Block the characters on the floor plan, marking their starting positions and movements throughout the scene.
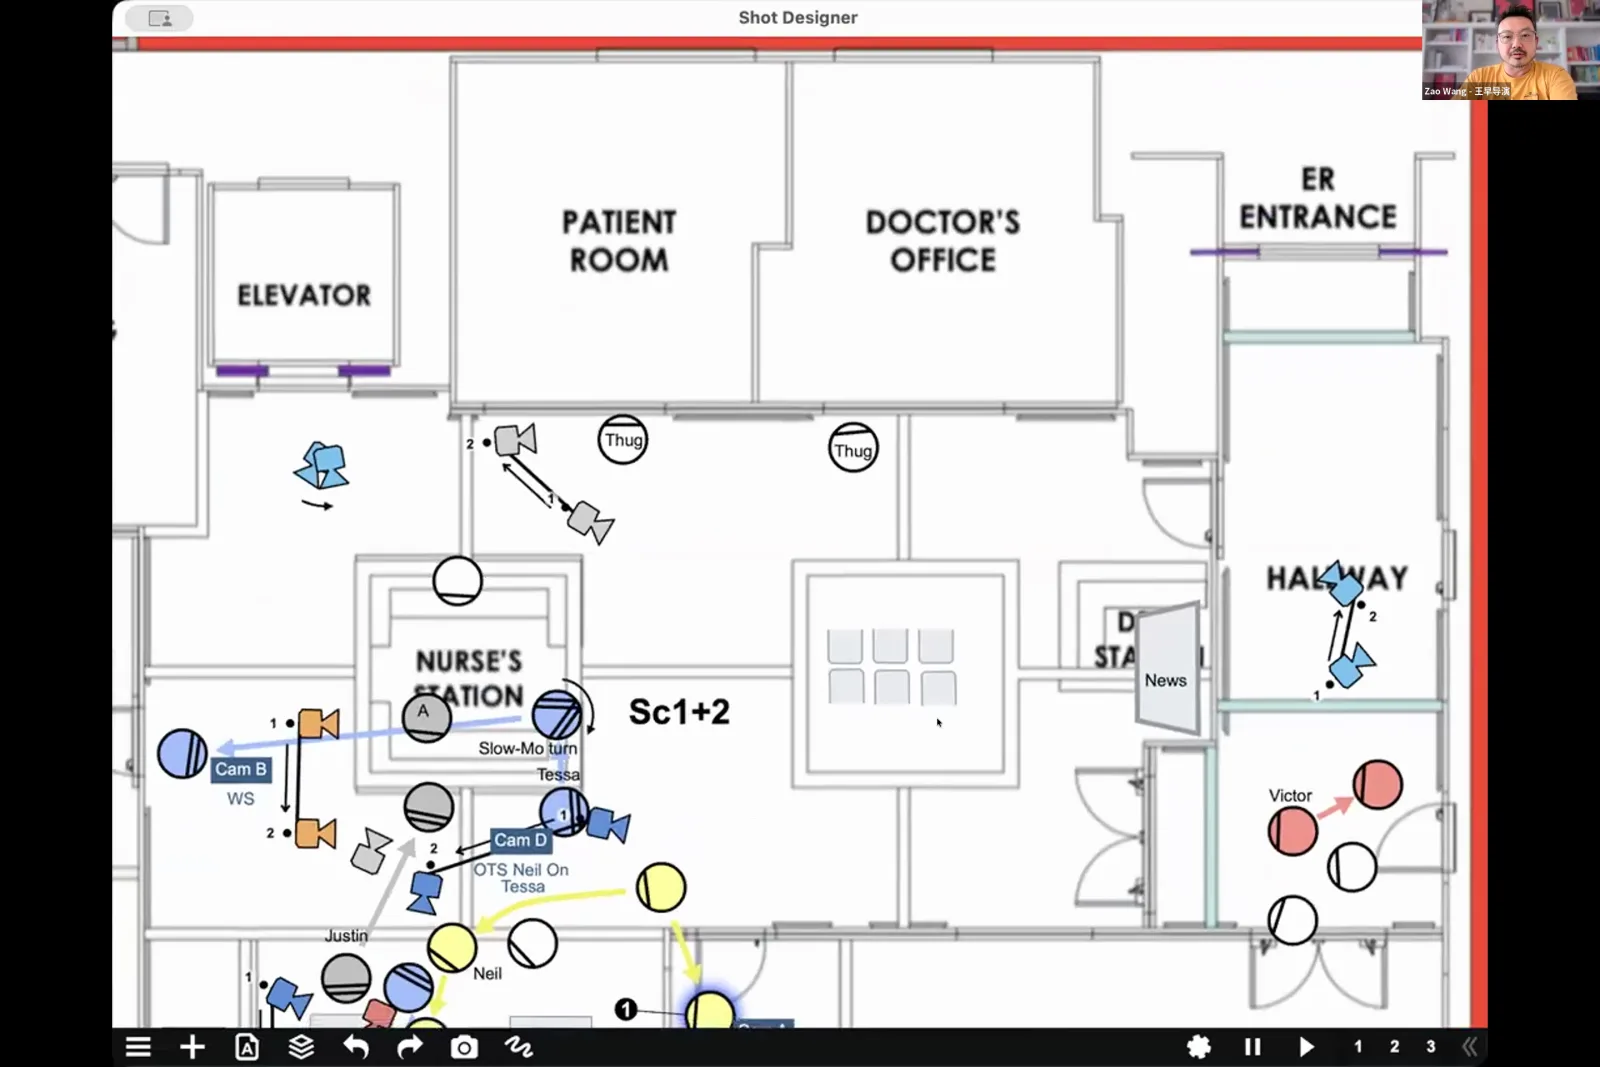
Block the characters on the floor plan, marking their starting positions and movements throughout the scene.
Step 5. For each interaction, identify the 'line of action' between the characters.
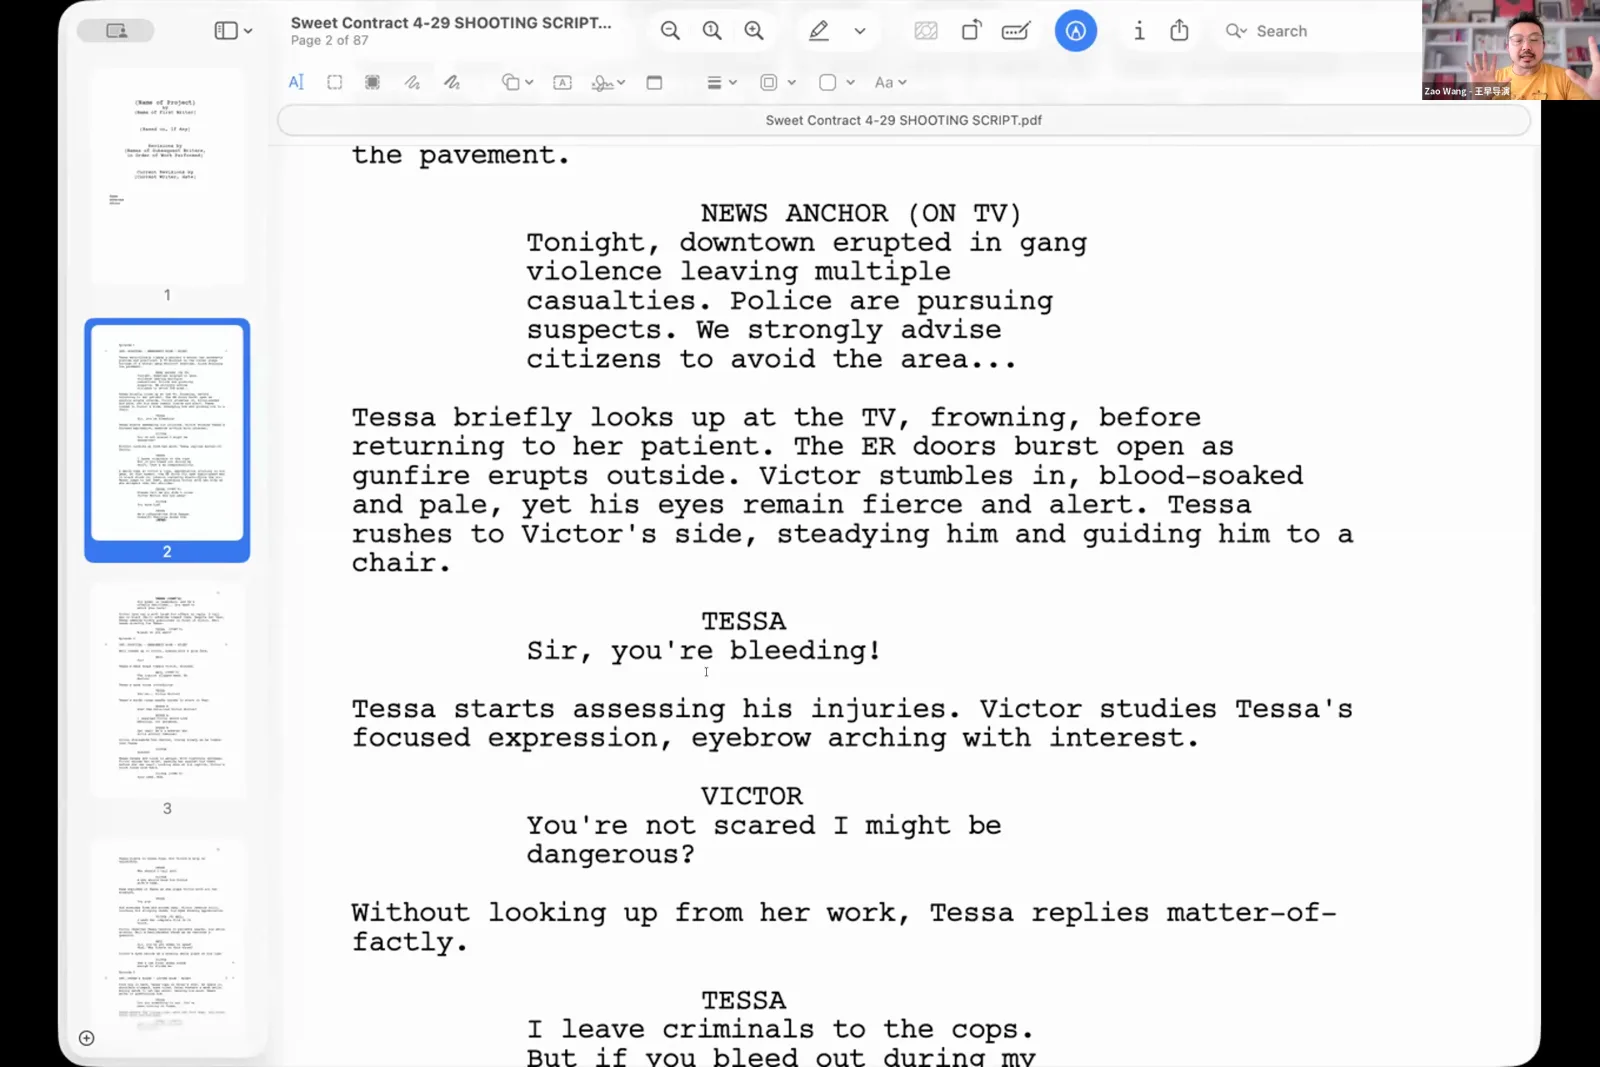
The screenplay details the interaction between characters, which helps define the scene's line of action.
Step 6. Place cameras on the floor plan for your master shot and all necessary coverage (close-ups, medium shots), ensuring they all stay on one side of the 180-degree line for each interaction.
Start by finding the one wide angle that can capture the most information, then add closer shots for emotional impact and detail.
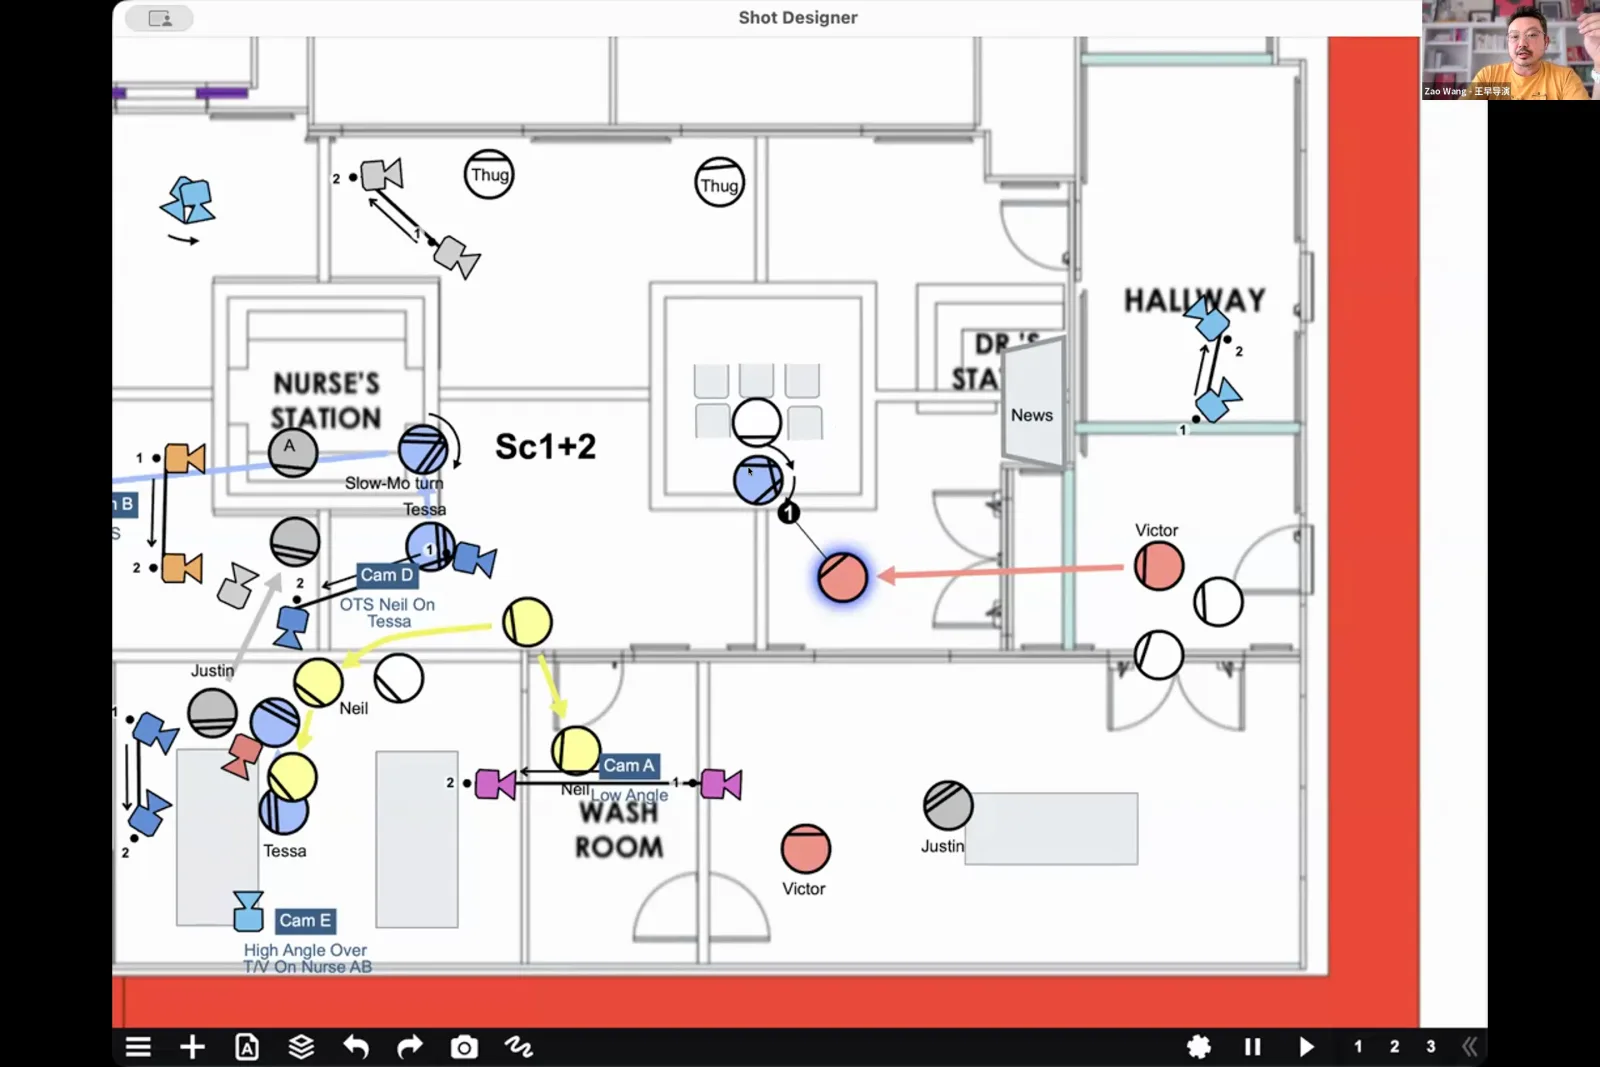
This shot plan demonstrates how to position multiple cameras to cover a scene with several characters and actions.
Step 7. Determine the minimum number of shots needed to tell the story of the scene effectively.
Creating a Visual Style Tag
To ensure your series has a cohesive look, you'll create a single, descriptive sentence called a 'style tag' that will be used in every image generation prompt.
Step 1. Find 3-5 reference images that capture the desired visual style for your series.
Step 2. Upload an image to an LLM like ChatGPT.
Step 3. Prompt the LLM to 'describe the visual style of this image'.
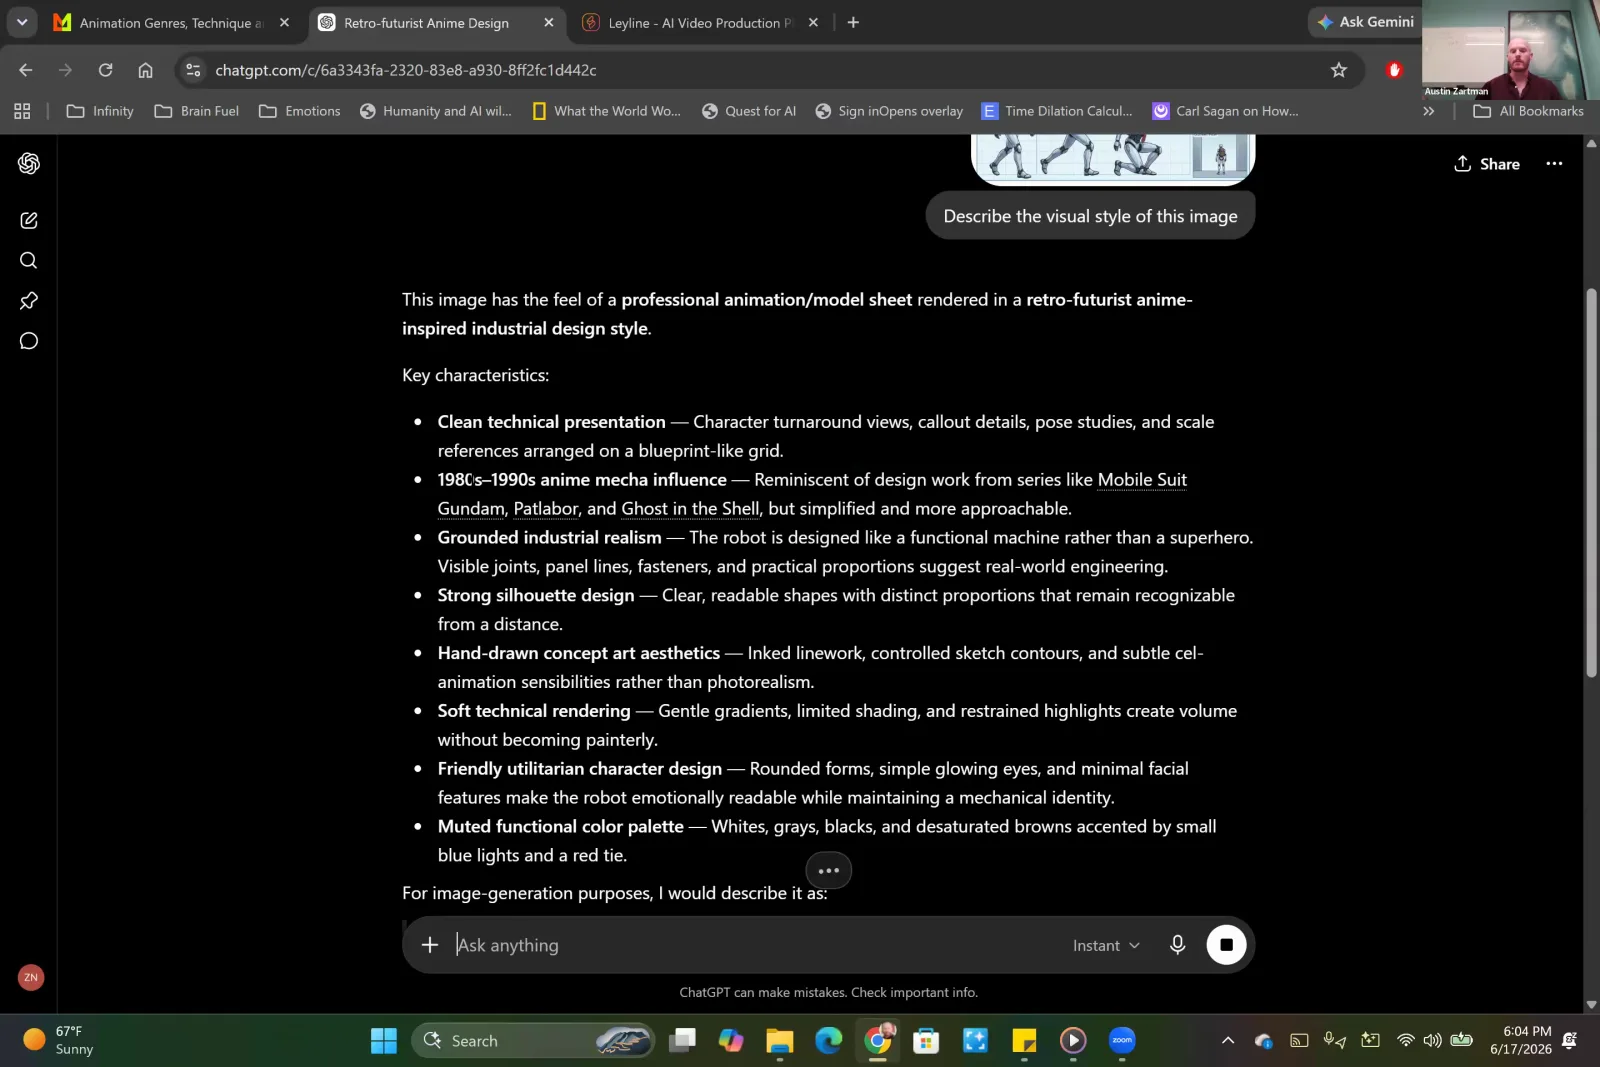
Prompting the LLM to describe an image's visual style generates a detailed list of characteristics.
Step 4. Repeat for all reference images and identify recurring keywords and themes in the descriptions.
Step 5. Ask the LLM to consolidate the keywords into a single, one-sentence style tag with 4-6 key descriptors.
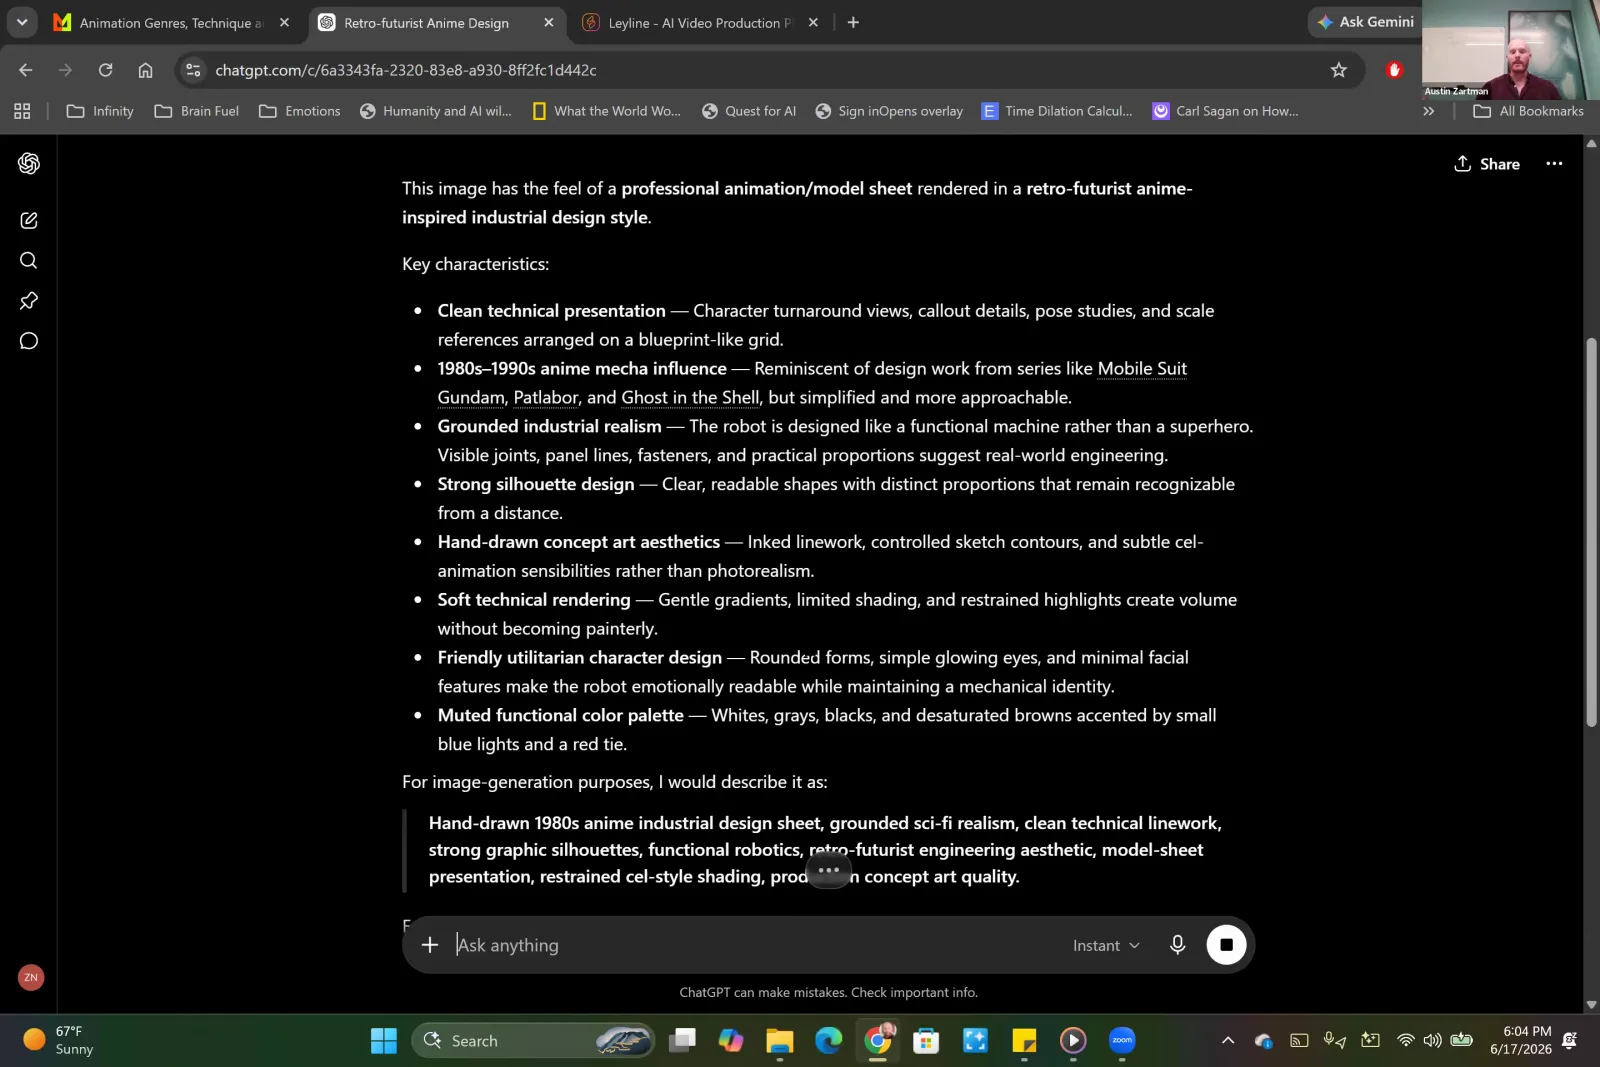
The AI consolidates the key characteristics into a single, powerful prompt for image generation.
Step 6. Copy this style tag and append it to the end of every image generation prompt to maintain a consistent look.
Generating Character Reference Assets
Consistent characters are crucial, so this process involves creating a full set of reusable reference images, including a character sheet and sprite sheet, for each main character.
Step 1. Generate a full-body 'hero shot' of your character against a plain background, iterating until it's as close to 100% correct as possible.
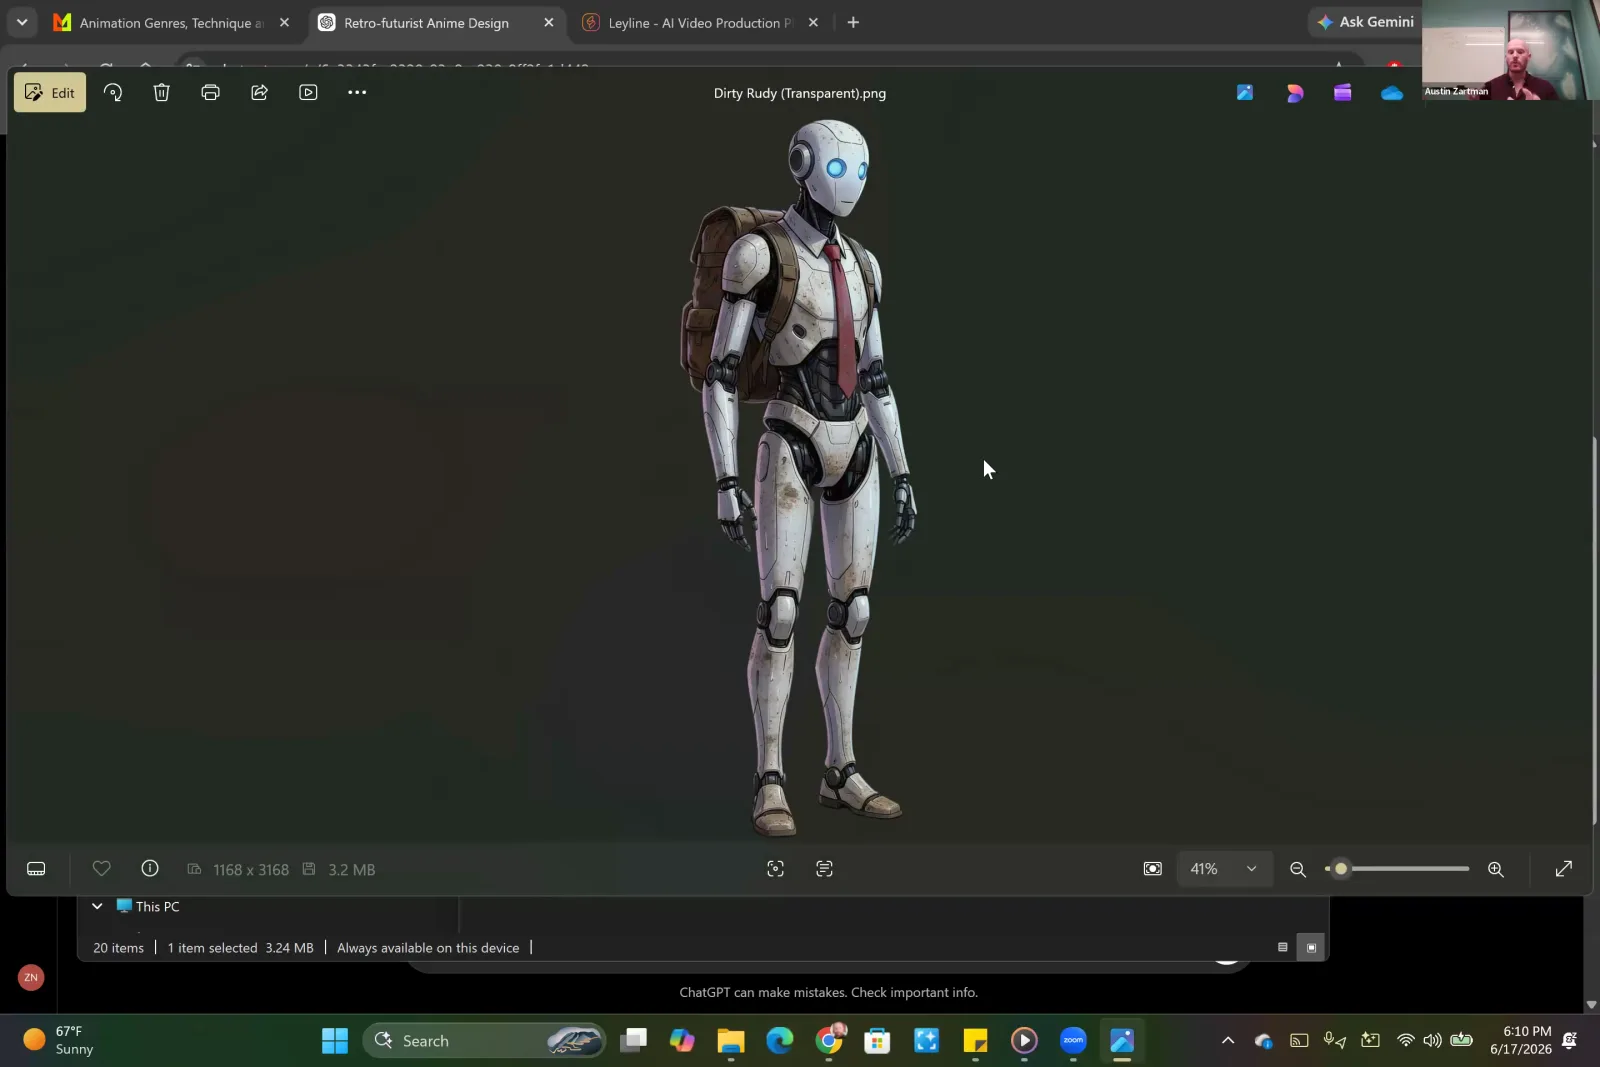
Generate a full-body hero shot of your character on a plain background to use as a consistent reference.
Step 2. Use the hero shot as a reference image and prompt the model to create a 'character sheet' of the character from all different angles (front, back, left, right).
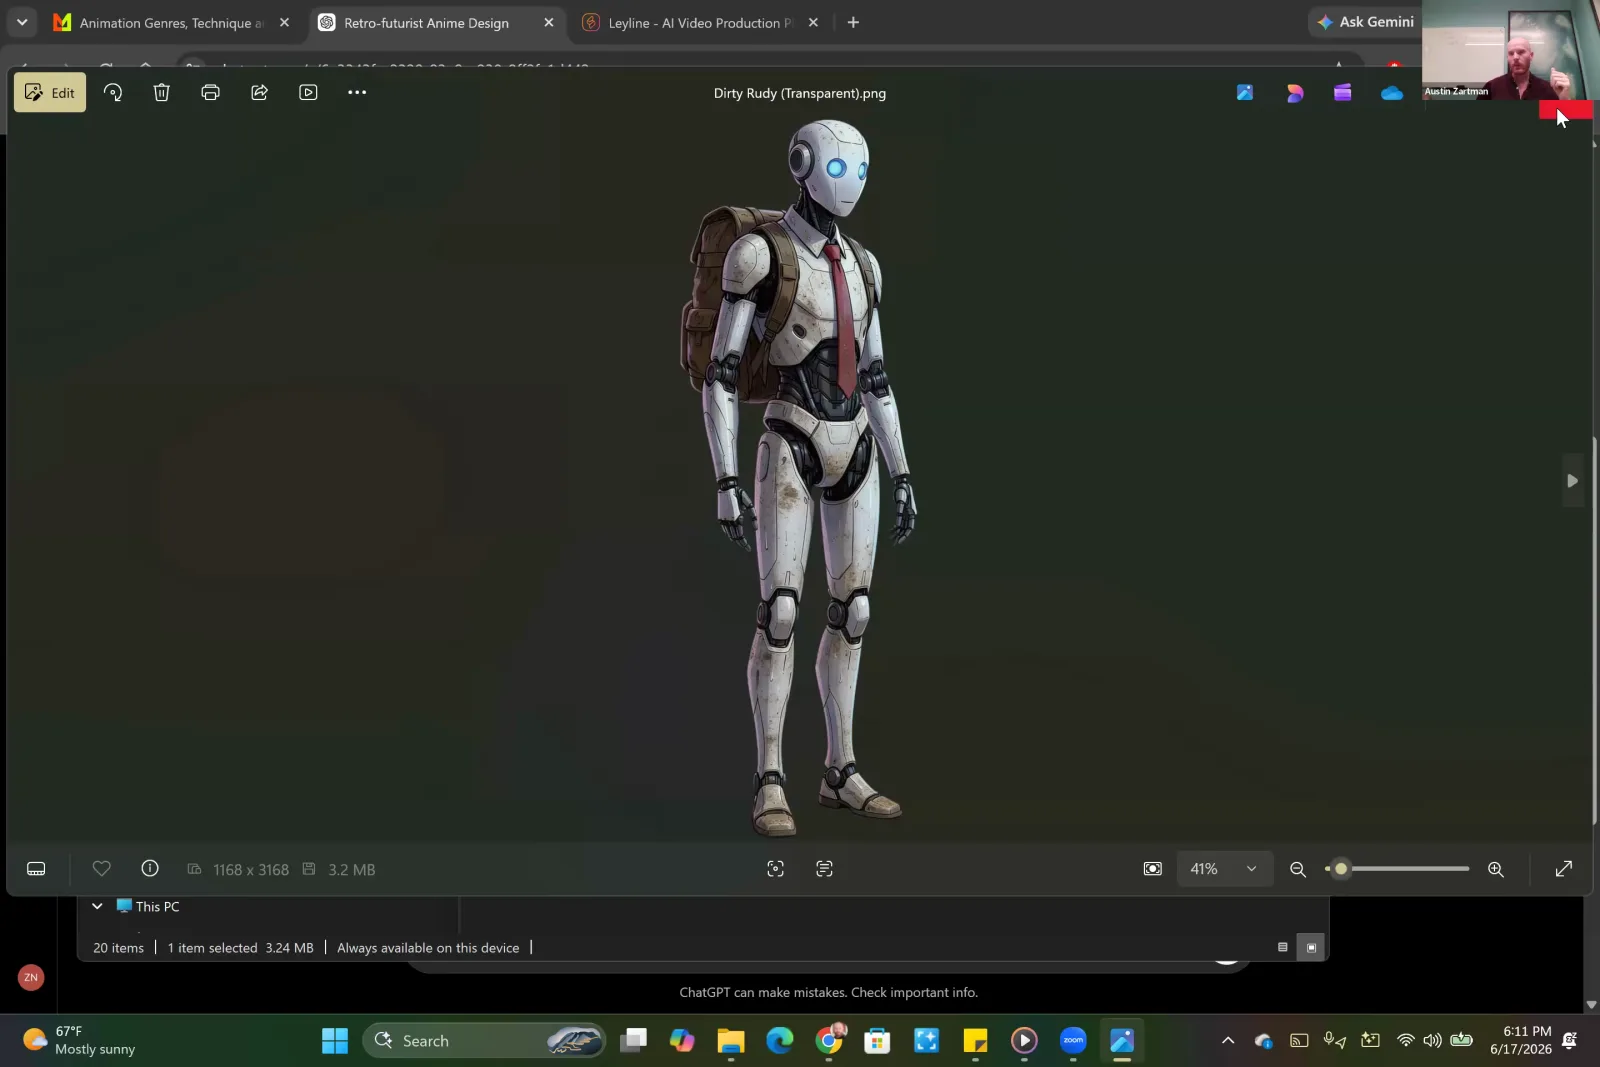
Start with a strong 'hero shot' of your character to use as a reference for generating a full character sheet.
Step 3. Use the hero shot as a reference image again and prompt for a 'sprite sheet' showing the character in various movements like walking, running, and crouching.
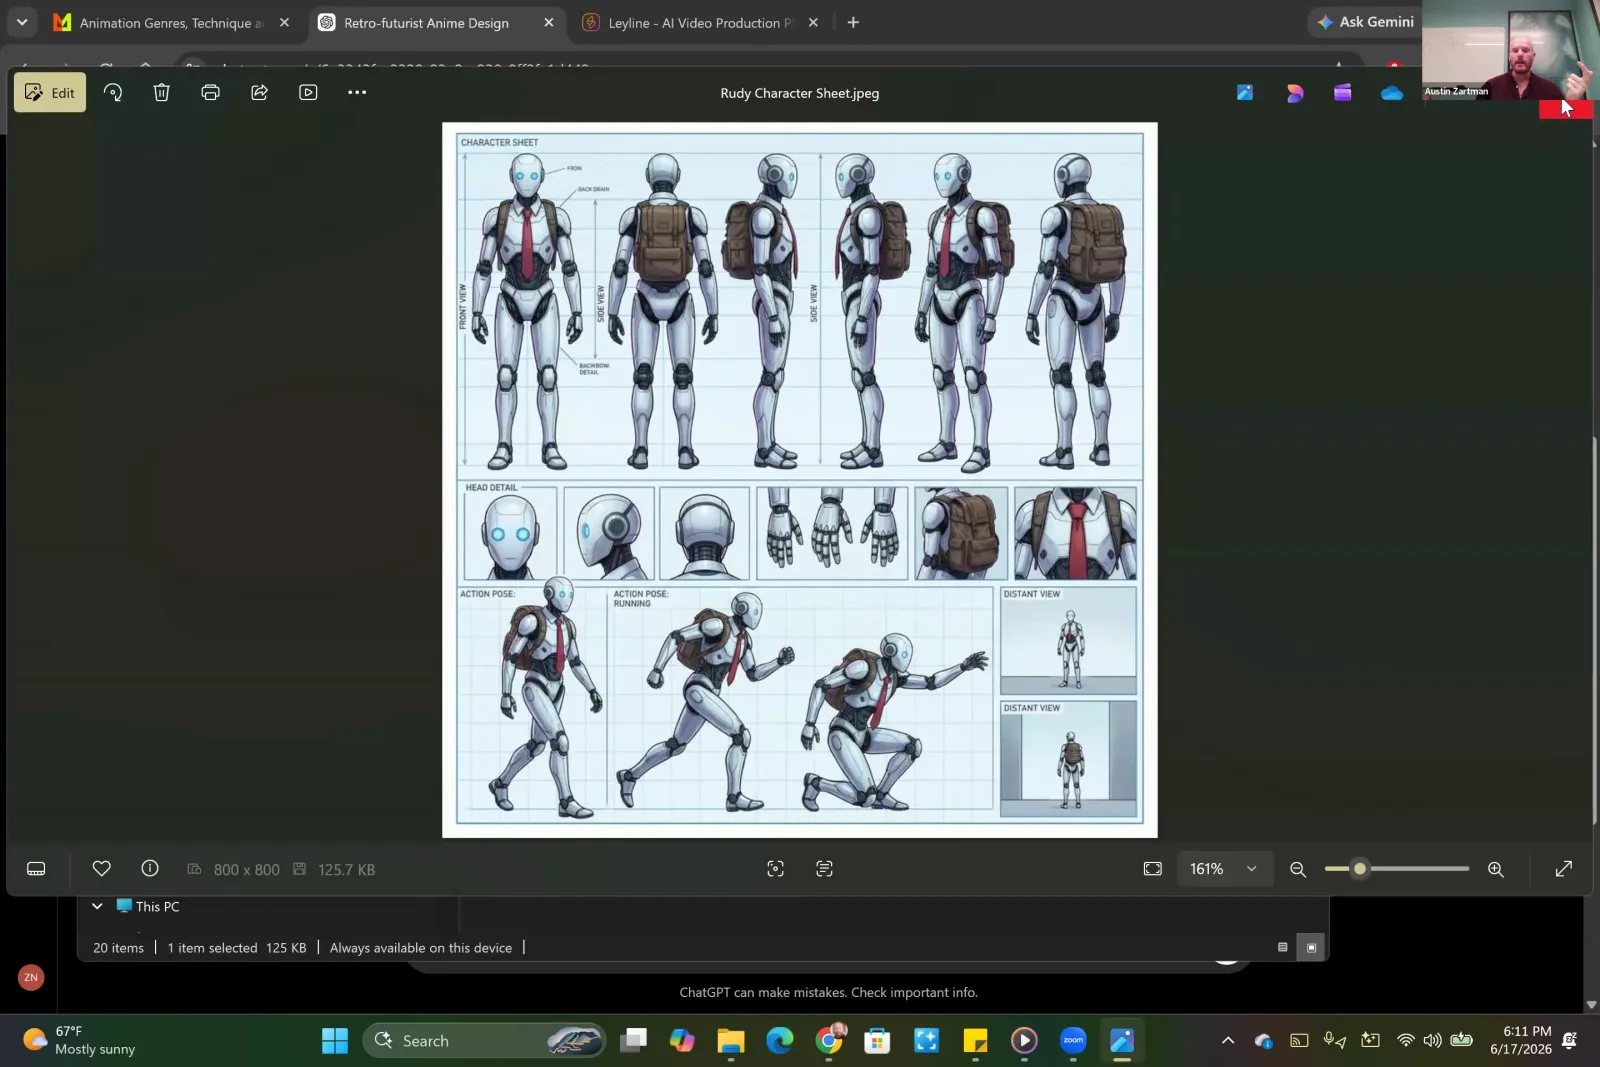
The AI generates a detailed character sheet, also known as a sprite sheet, with various poses and angles.
Step 4. Upscale these three key images to the highest possible resolution.
Step 5. Store these assets in your project's 'Bible' in Layline or a dedicated folder for easy reference.
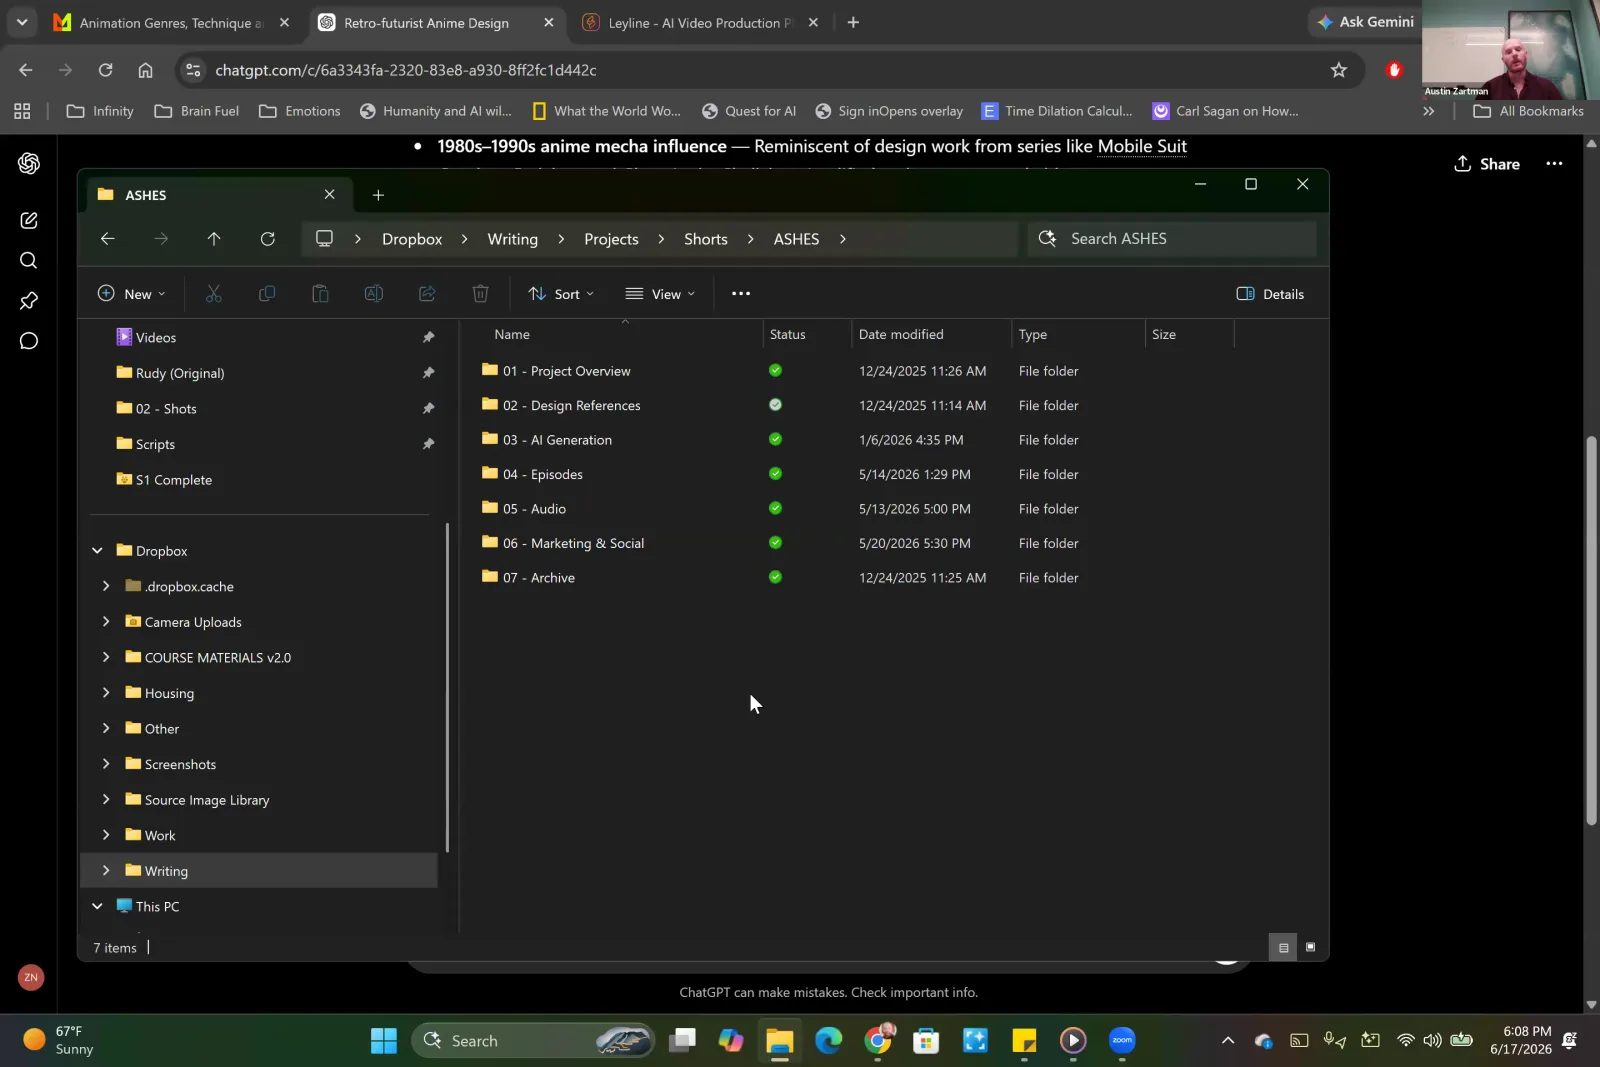
Organize your project assets in a dedicated folder with clearly labeled subfolders.
Generating Keyframes for an Episode in Layline
With your script, style, and characters defined, you can now generate all the necessary still images, or keyframes, that will form the visual backbone of your episode.
Step 1. In your Layline project, upload your series bible to populate the project's core information.
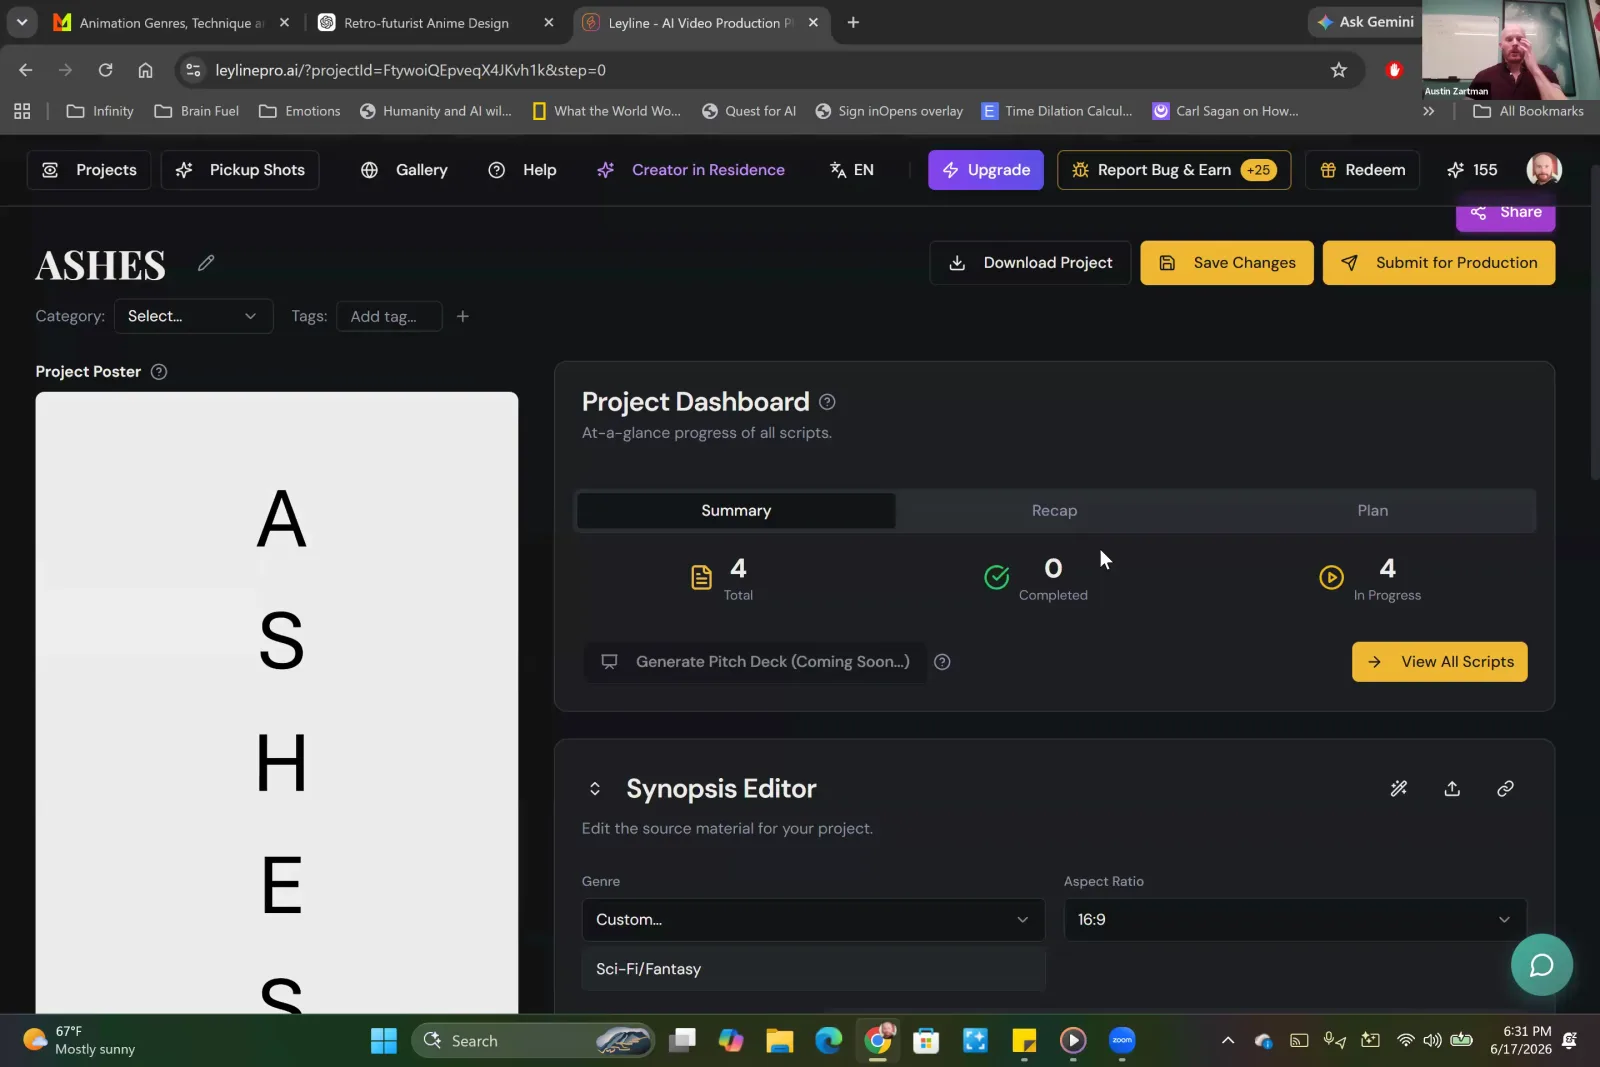
Your project's main dashboard contains the Synopsis Editor, where you can add your source material.
Step 2. Navigate to the 'Design Bible Assets' section and generate or upload the reference assets (character sheets, etc.) for your main characters.
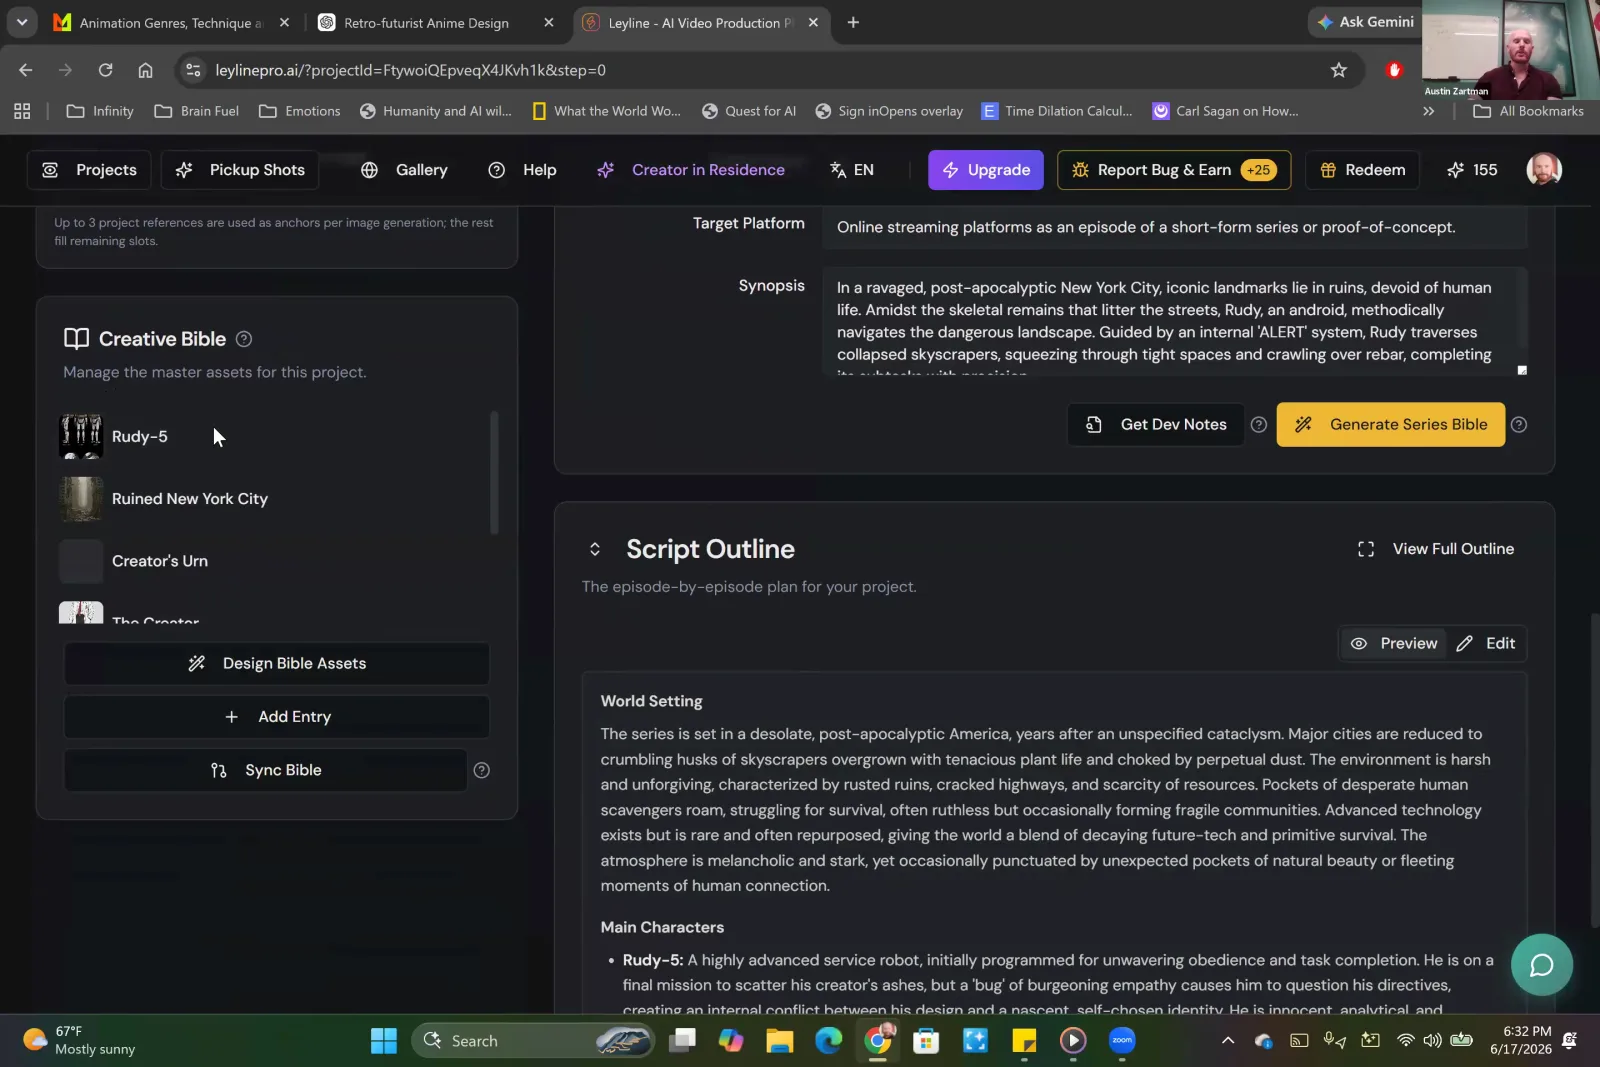
In the Creative Bible on the left, click 'Design Bible Assets' to start creating your character sheets and other key references.
Step 3. Create a new episode and upload your formatted script.
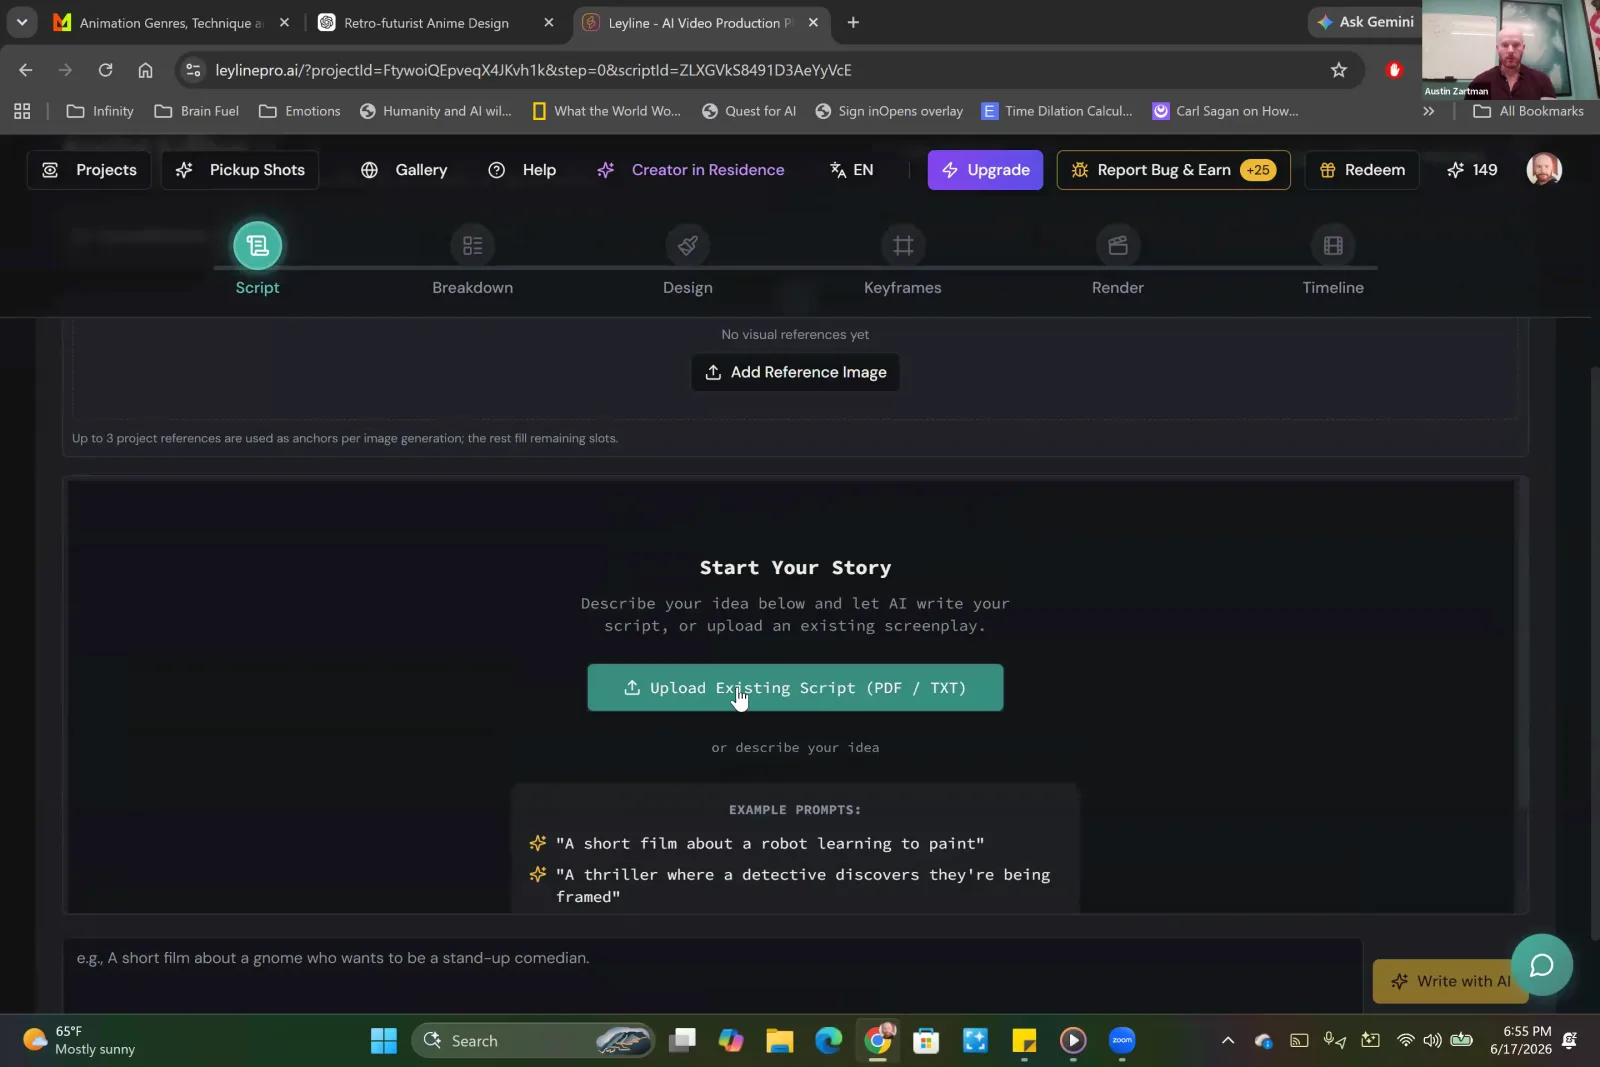
In the Script tab, select 'Upload Existing Script' to import your screenplay.
Step 4. In the breakdown settings, select the 'Cinematic (40-60 shots)' option and continue to generate the shot list.
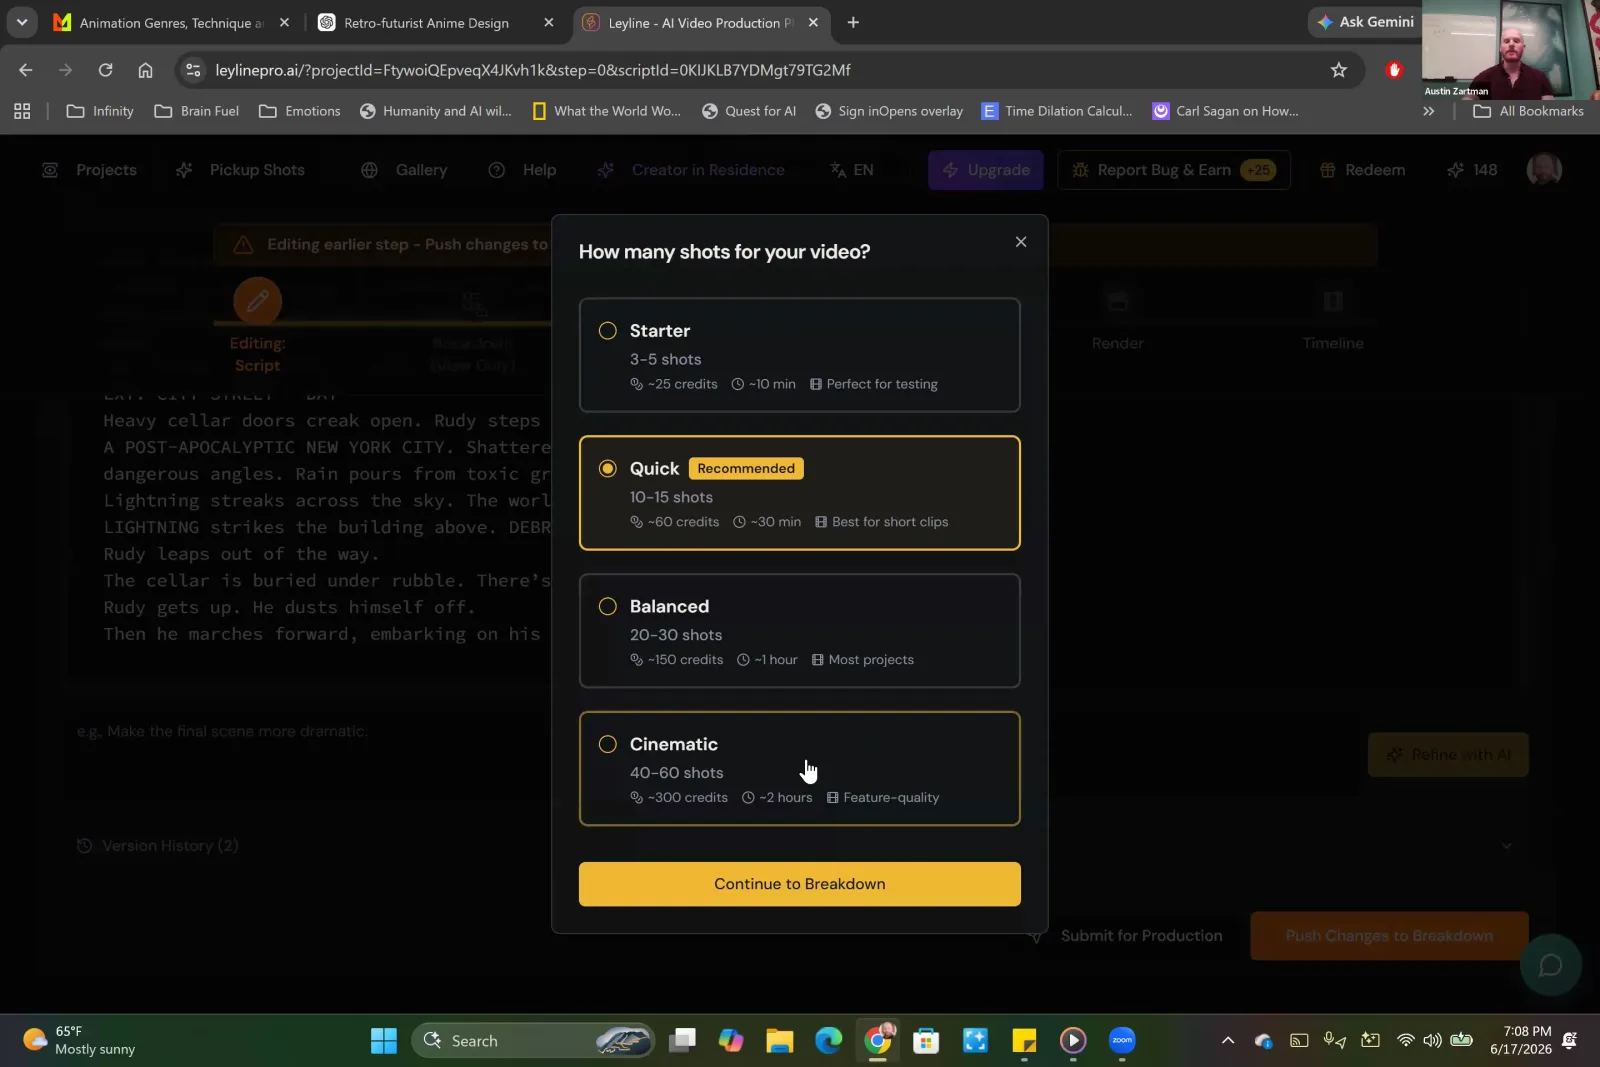
Select the 'Cinematic' option to generate a 40-60 shot breakdown for your video.
Step 5. Review the generated shot list, ensuring characters, settings, and actions are correctly identified for each shot. Combine or delete shots as needed.
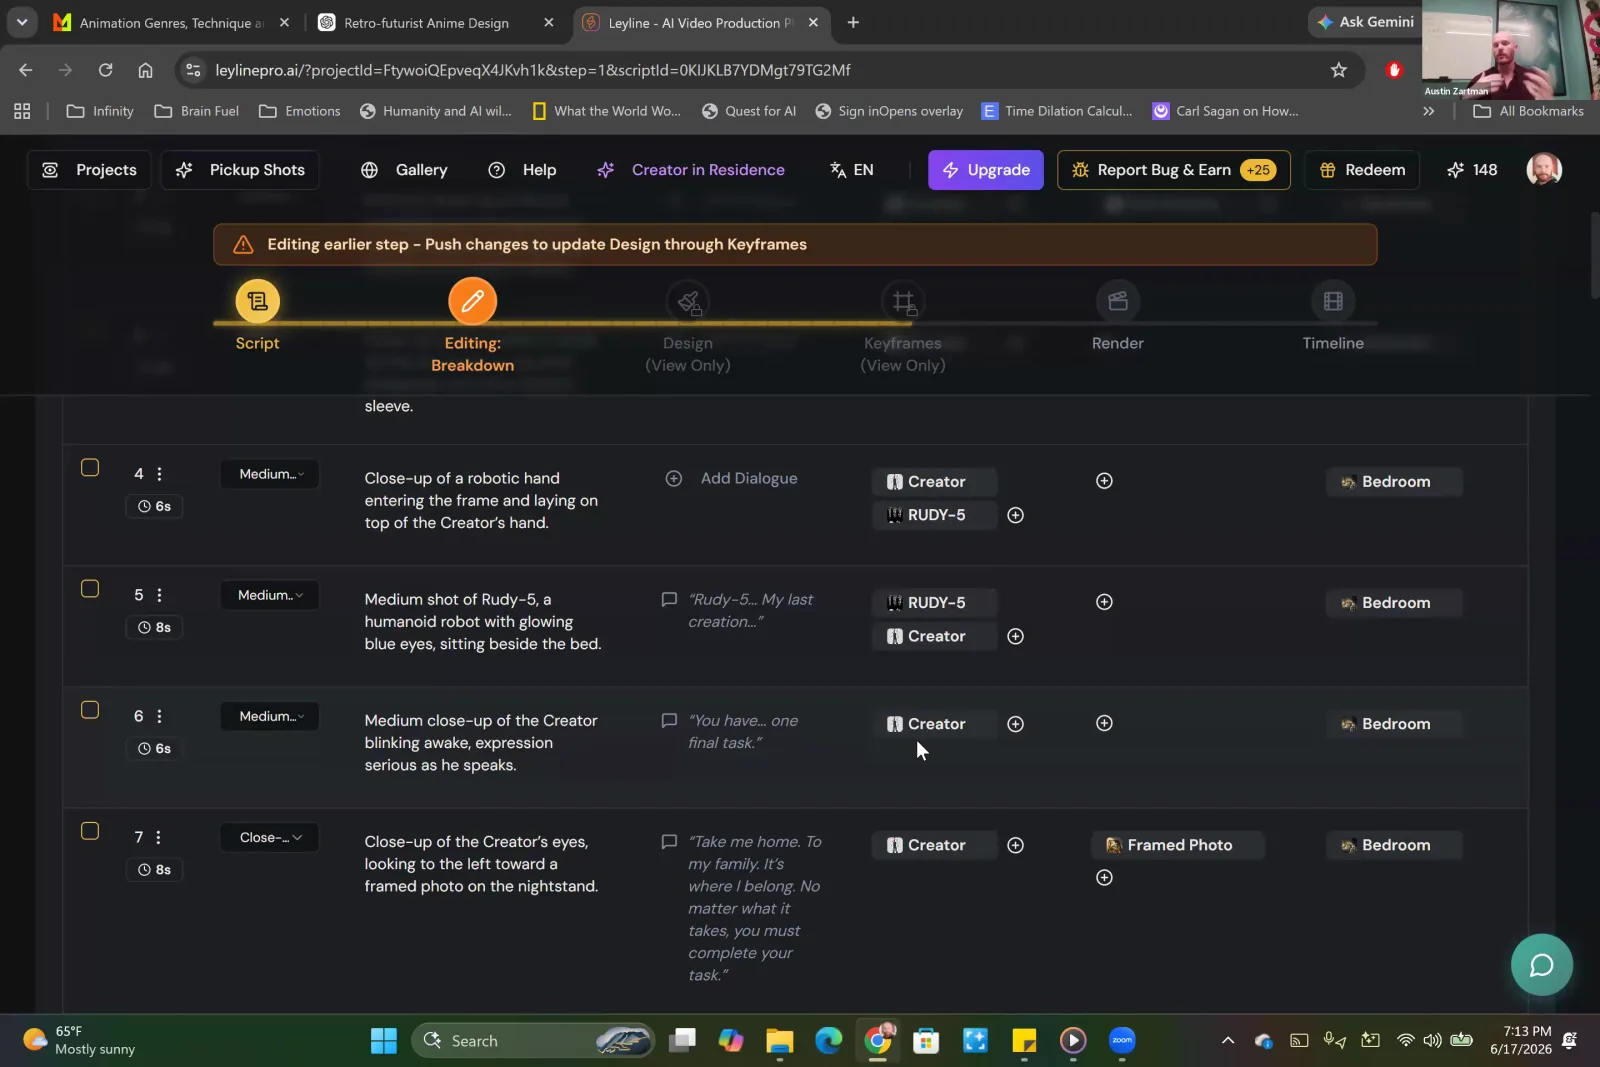
Review the AI-generated shot list, which breaks down each scene by action, dialogue, characters, and setting.
Step 6. Push changes to the 'Design' stage and review the assets identified for the episode. Generate any new, episode-specific assets required.
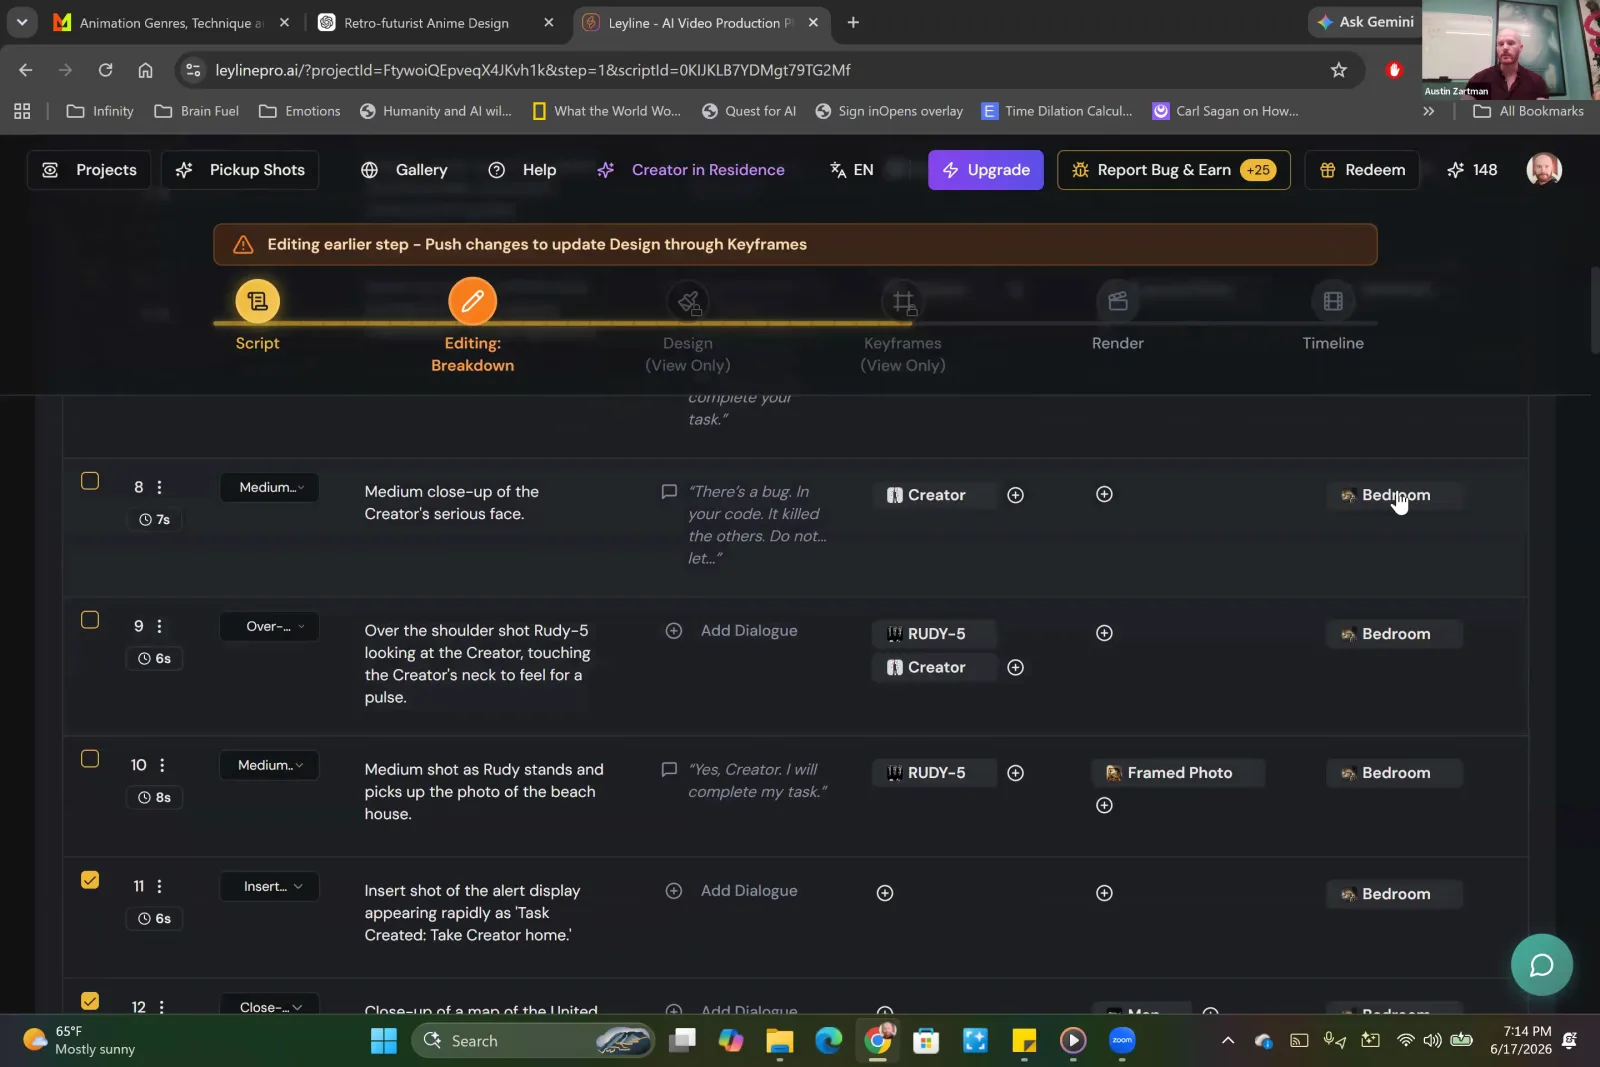
In the Editing Breakdown, review the assets Leyline has identified for each shot, such as characters, props, and locations.
Step 7. Proceed to the 'Key Frames' stage. Go through each shot one-by-one, review the prompt, and generate the image.
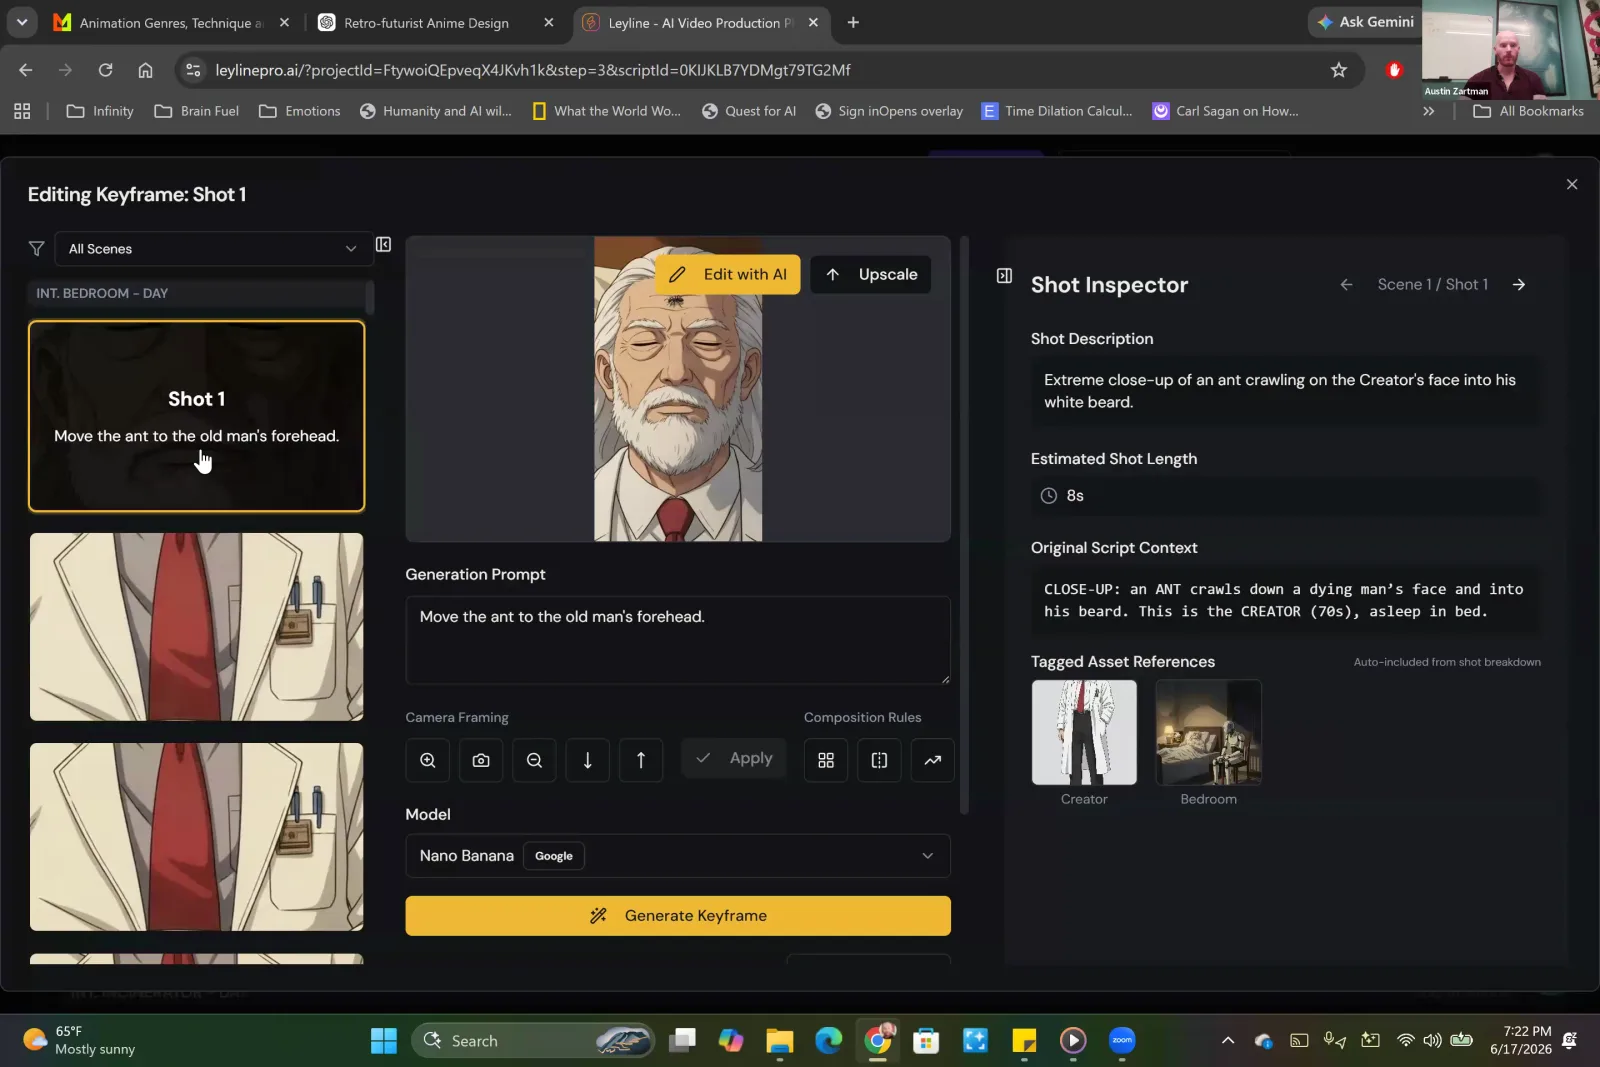
In the Keyframe editor, review the generation prompt for each shot and click 'Generate Keyframe' to create the visual.
Step 8. Use the 'Edit' tool to make specific changes to generated images, following the 80/20 rule to get them to their final state.
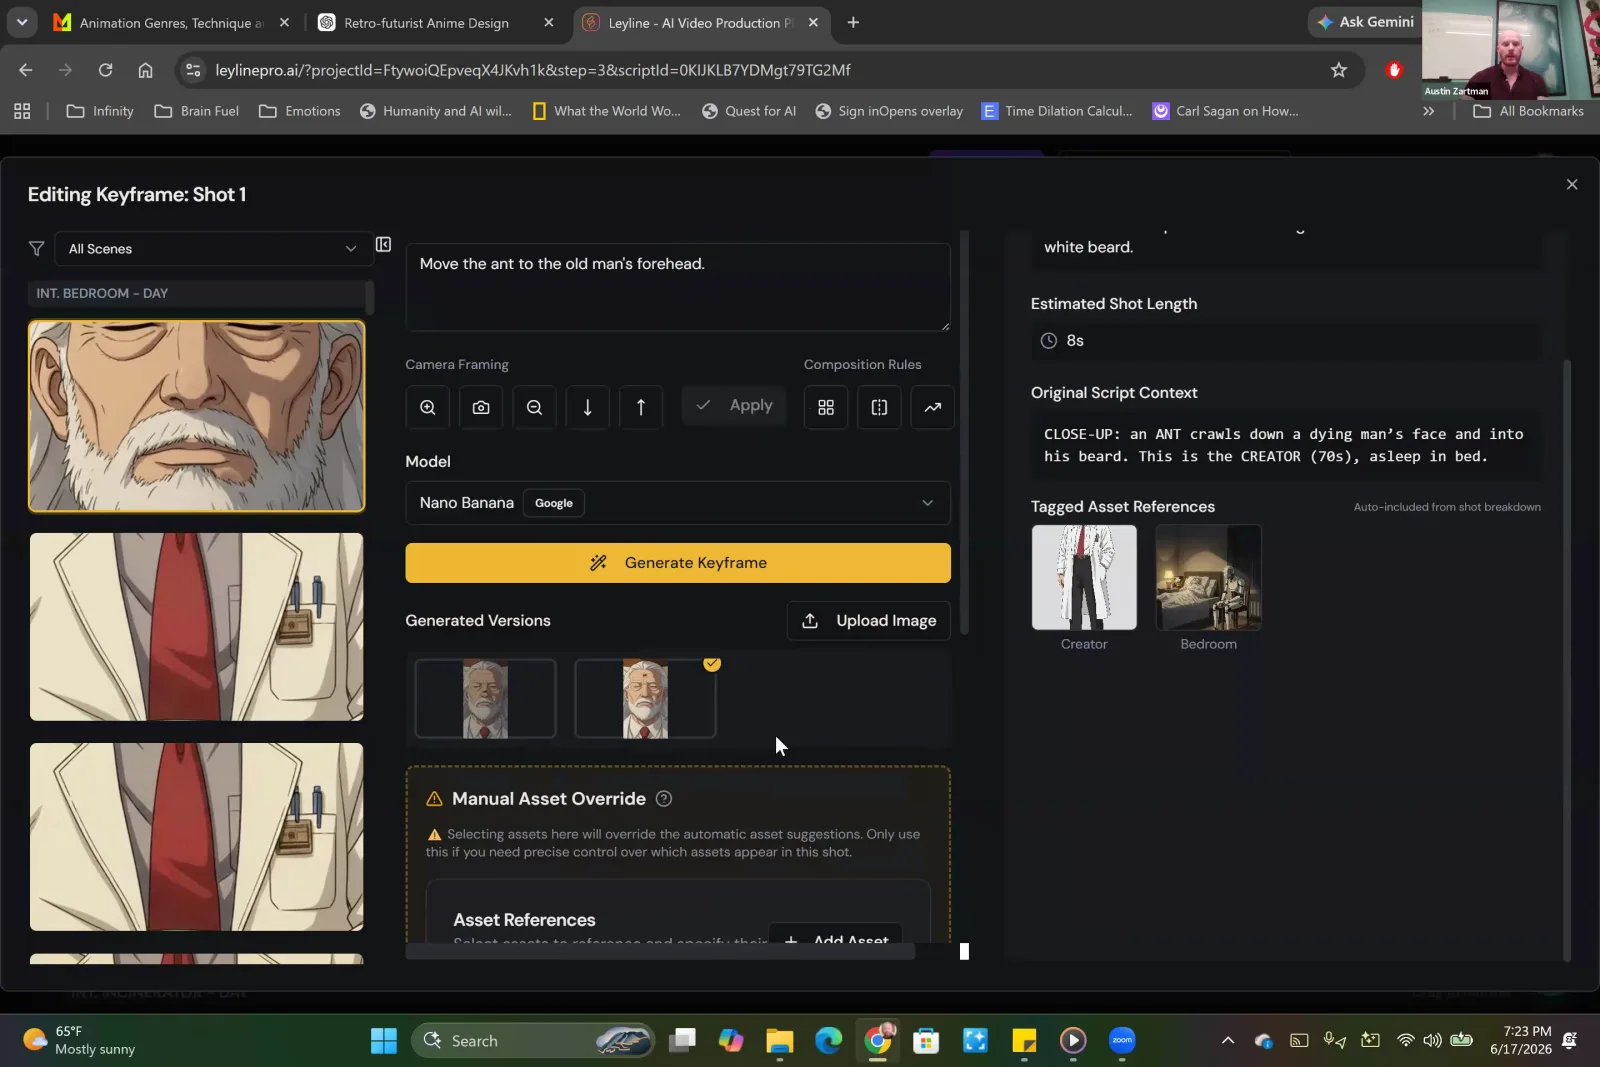
Make specific changes to a generated keyframe, like moving an ant, by entering a simple text prompt.
Key terms
Reference Packages. A collection of pre-generated visual assets for a series, including main characters, important objects, and recurring locations, used to maintain consistency across episodes.
Key Frames. The still images generated from a script that serve as the starting point or foundation for AI video generation models.
Directing as Relationship. A directing philosophy that focuses on the relationships between characters, between a character and their environment, and even within a character themselves, as the primary driver for visual storytelling.
Point of View (POV). The perspective from which a scene is shot. Different shots (e.g., an objective wide shot vs. a character's direct POV) evoke different feelings and audience reactions.
Hook, Turn, and Cliffhanger. The three core structural elements of a vertical microdrama episode: the hook grabs attention in the first 5 seconds, the turn introduces a twist or new information, and the cliffhanger leaves the audience wanting to see the next episode.
Blocking. The process of planning where actors (or characters) will move and be positioned within a scene and in relation to the camera.
Floor Plan. A top-down diagram of a location or set used by directors to plan character movement (blocking) and camera placements.
Line of Action. An imaginary line connecting two characters who are interacting. This line is crucial for determining camera placement and maintaining the 180-degree rule.
180-Degree Line. A fundamental filmmaking guideline that states the camera should stay on one side of the line of action between two characters to maintain consistent screen direction and spatial relationships.
Coverage. The collection of all the different shots (wides, mediums, close-ups) filmed for a scene, which are later edited together to construct the final sequence.
Mise-en-scène. A French theatrical term meaning 'placing on stage.' In film, it refers to the arrangement of everything that appears in the frame—actors, lighting, décor, props, costume—to tell the story visually.
Master Shot. A single, wide shot that captures all the action and dialogue in a scene from start to finish. Other, closer shots (coverage) are then edited into it.
Dissolve. An editing transition where one shot gradually fades out while the next shot gradually fades in, with the two images overlapping for a moment.
Stylized Realism. A visual style common in AI microdramas that looks realistic but has a glossy, slightly artificial quality, which has become a recognizable convention of the genre.
Style Tag. A one-sentence phrase containing 4-6 descriptive keywords about a specific visual style, which is appended to image generation prompts to help the AI model maintain consistency.
Character Sheet. A reference image showing a character from multiple angles (front, back, left, right) in a neutral standing pose. It's a crucial asset for maintaining character consistency.
Sprite Sheet. A reference image showing a character in various action poses or movements, such as walking, running, or crouching. This is used to generate consistent-looking action shots.
Hero Shot. A high-quality, full-body image of a character that serves as the primary reference for their design. It's the first and most important asset to create for a character.
Positive Framing. A prompting technique where you describe what you want to see in an image, rather than what you don't want to see (e.g., 'an empty street' instead of 'a street with no cars').
80/20 Rule (for Image Generation). The principle that it's more efficient to generate an image that is 80% correct and then use editing tools to fix the remaining 20%, rather than trying to achieve a perfect image through prompting alone.
Nana Banana. The primary image generation model used within the Layline platform, recommended for creating keyframes and assets.
Layline. The end-to-end AI filmmaking platform used in the masterclass, which handles script breakdown, asset management, keyframe generation, and video rendering for episodic content.
Common mistakes to avoid
- Breaking the 180-degree line, which makes characters appear to switch places and disorients the viewer.
- Making scenes overly complex with too many characters, locations, or actions, which dramatically increases production time and difficulty.
- Failing to create consistent reference assets for characters, leading to them looking different from shot to shot.
- Using negative prompting for image generation (e.g., 'no cars') which can confuse the model, instead of positive framing ('empty street').
- Wasting time and credits trying to generate a perfect image in one go, instead of getting an 80% solution and using editing tools to fix the rest.
- Not establishing a clear visual style upfront, causing the look of the series to drift over time.
- Forgetting that keyframes are the start or end points of an action, not a description of the entire action itself.
Frequently asked questions
How do I direct a scene for an AI-generated movie?
Directing for an AI movie starts with breaking your script into specific shots. You block character positions and movements on a floor plan, establishing a clear line of action. By defining camera angles and adhering to principles like the 180-degree rule, you create a concrete visual blueprint before generating any images.
What is the best way to maintain character consistency in AI animation?
To maintain character consistency, create a comprehensive reference package for each character before generating episode keyframes. This includes a character sheet showing their appearance from multiple angles and a sprite sheet displaying various expressions. These assets ensure the character looks the same across every shot in your series.
How can I develop a consistent visual style for my AI-generated series?
Develop a consistent visual style by creating a 'style tag'—a single, descriptive sentence that defines the look and feel of your series. This tag, which might specify elements of lighting, color, and medium, is then included in every image generation prompt to ensure a cohesive aesthetic across all keyframes.
What are the best practices for writing prompts for AI image generators?
For effective AI image prompts, use positive framing to describe what you want, rather than using negative terms for what you don't. Aim for an 80% solution instead of perfection, as you can edit details later. Remember that a keyframe prompt should describe the start or end of an action.
What is the 180-degree rule in filmmaking and why is it important?
The 180-degree rule is a guideline where the camera stays on one side of an imaginary 'line of action' between two characters. Following this rule ensures that characters maintain their on-screen positions relative to each other, preventing audience disorientation that occurs when the line is broken.
In the instructor’s words
“Directing is about relationship. It's not just relationship between two characters... It's also relationship of the character to the environment. It's also about relationship between the character and him or herself.”
“So, at every moment, to think visually is to think what is the relationship. And when you're talking about relationship, you're also thinking about a point of view.”
“Different shots can give you different feelings.”
This tutorial was produced from the Leyline Masterclass recording (Cohort 1, Session 3, 2026-06-17). Screenshots are captured directly from the session.