Troubleshooting AI Video Generation
Cohort 9, Session 7 — taught by Austin Zartman, creator of the AI short-film series ASHES.
To make a film with AI, you generate video clips from a script and then troubleshoot the results. This process involves refining keyframes with detailed prompts and manual asset selection to fix character and style inconsistencies. You can generate additional 'pickup' shots to complete scenes and use negative prompts to control elements like unwanted music before assembling the final edit.
What you will learn
- Learn to diagnose and fix inconsistent AI video renders.
- Understand how to use 'pickup shots' to generate additional clips for an existing project.
- Master techniques for generating consistent keyframes, including detailed prompting and manual asset overrides.
- Learn how to reorder shots and manage the project timeline.
- Discover how to use negative prompts to control audio elements like music.
- Understand how to manage project-level settings like aspect ratio.
Troubleshoot and Finalize a Video Timeline
If the platform's timeline previewer is not working, you can still finalize your project by downloading all your generated clips and assembling them in an external editor.
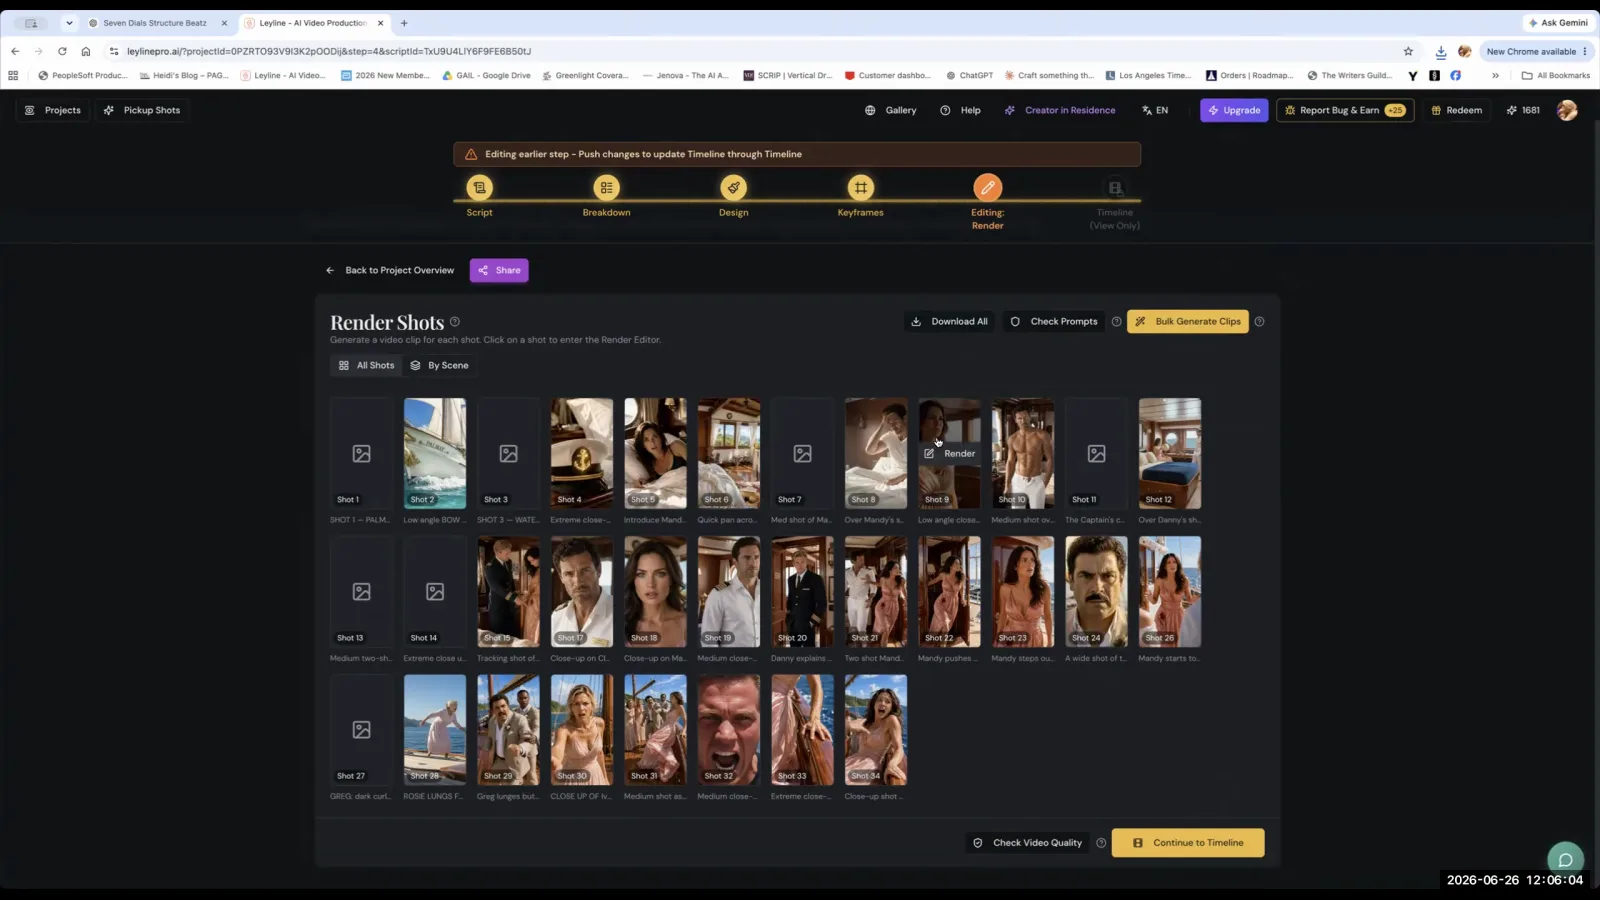
Step 1. Navigate to the 'Render' tab of your project.
Step 2. Click the 'Download All' button to save all generated video clips to your computer.
Step 3. Import the downloaded clips into your preferred video editing software (e.g., Premiere, Capcut).
Step 4. Assemble the clips on the timeline to preview the full sequence.
Generate Additional 'Pickup' Shots
Sometimes a scene needs a few more shots after the initial generation, so you can use this process to create additional 'pickup' shots to complete your sequence.
Step 1. From the main navigation, click on 'Pickup Shots'.
The "Pickup Shots" button in the top navigation allows you to generate additional shots for your project.
Step 2. Select the 'Video' tab.
Step 3. Choose a video generation model that supports reference images.
Step 4. Set the correct aspect ratio for your project (e.g., 9:16).
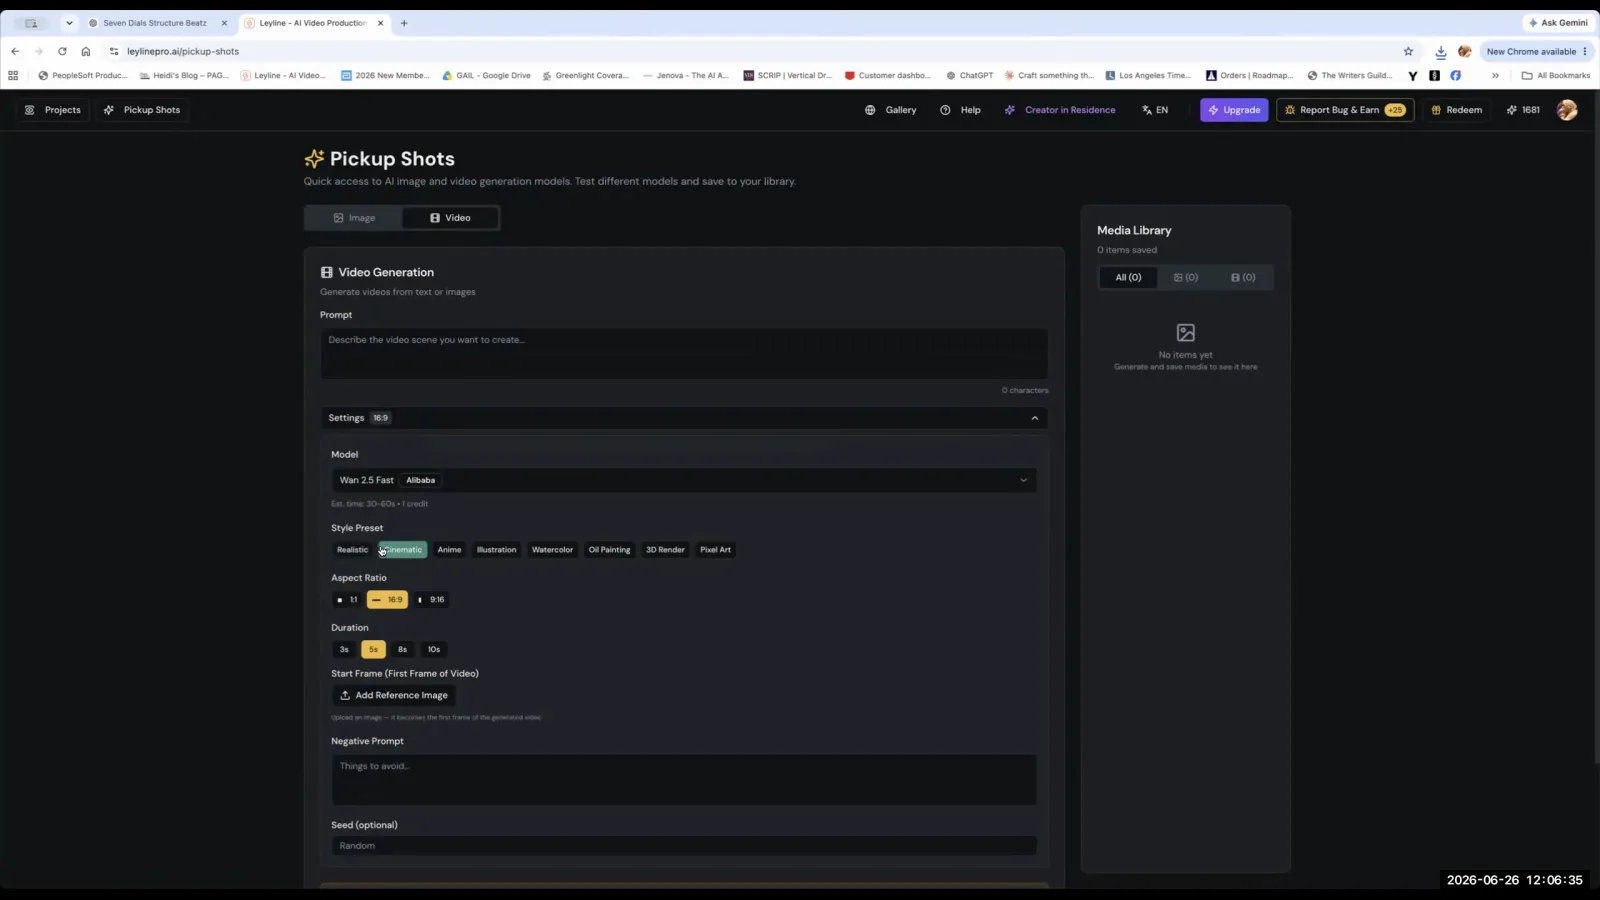
Choose the appropriate aspect ratio for your video, such as 16:9 for widescreen or 9:16 for vertical.
Step 5. Add a reference image and a prompt to generate the new, individual shot.
Improve Keyframe Consistency
To resolve visual inconsistencies, you must improve your keyframes by writing more detailed prompts and manually selecting the correct design assets for the generator to use.
Step 1. In the Keyframe generation view, identify a shot with inconsistent characters or locations.
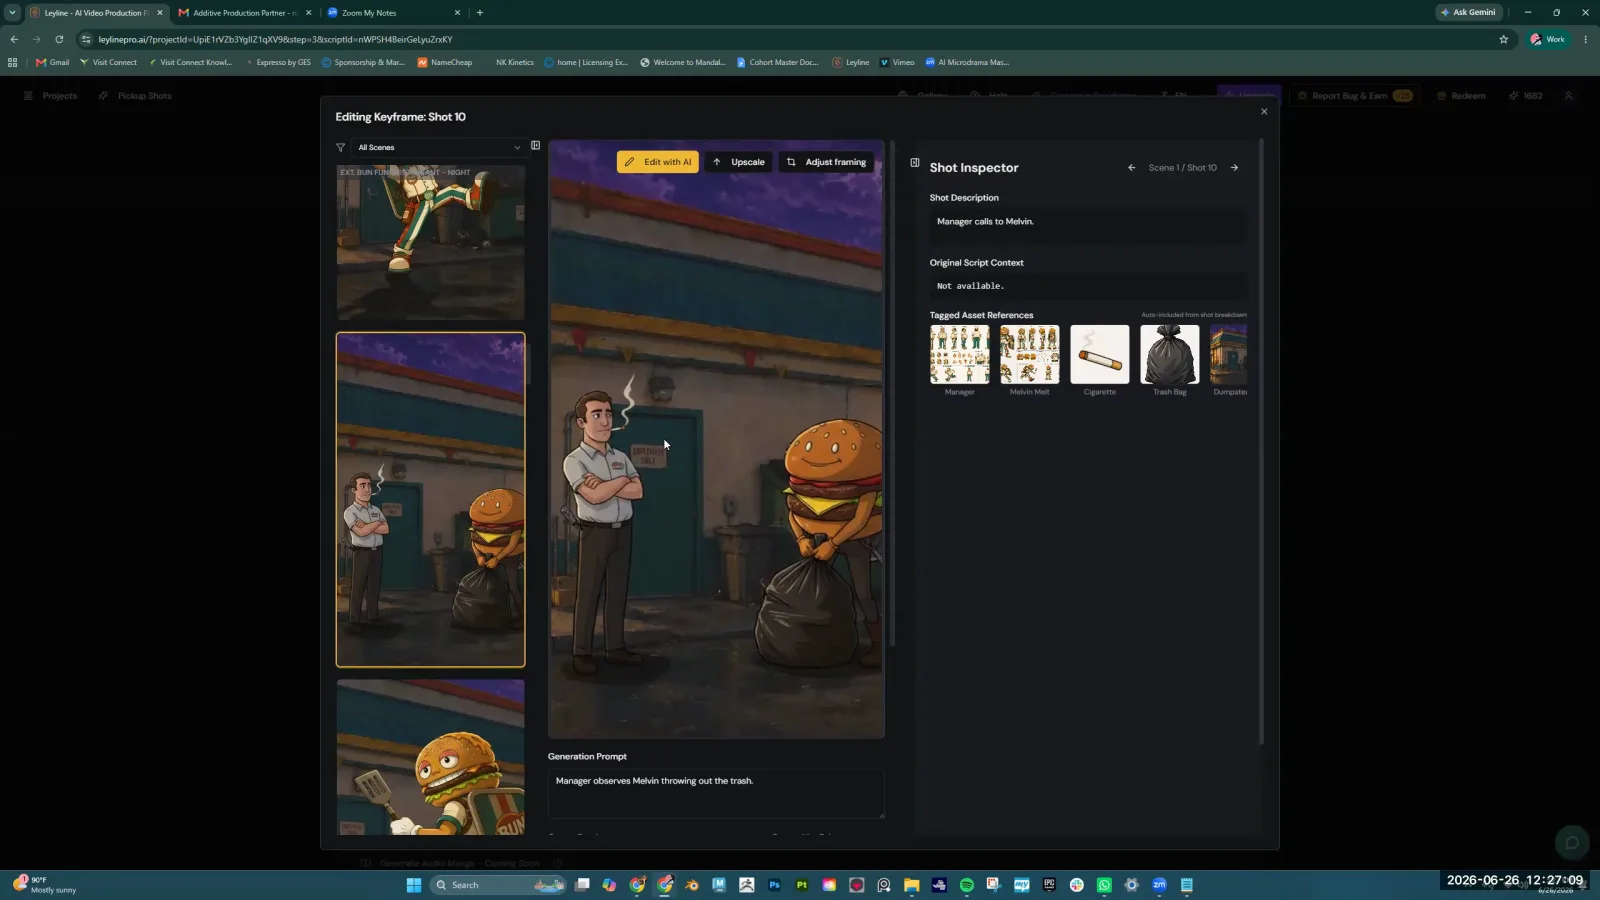
The keyframe editor displays several inconsistent AI-generated frames for the same shot, requiring you to choose the best option.
Step 2. Expand the prompt box and rewrite the prompt to be highly specific and detailed about character placement, actions, and environment.
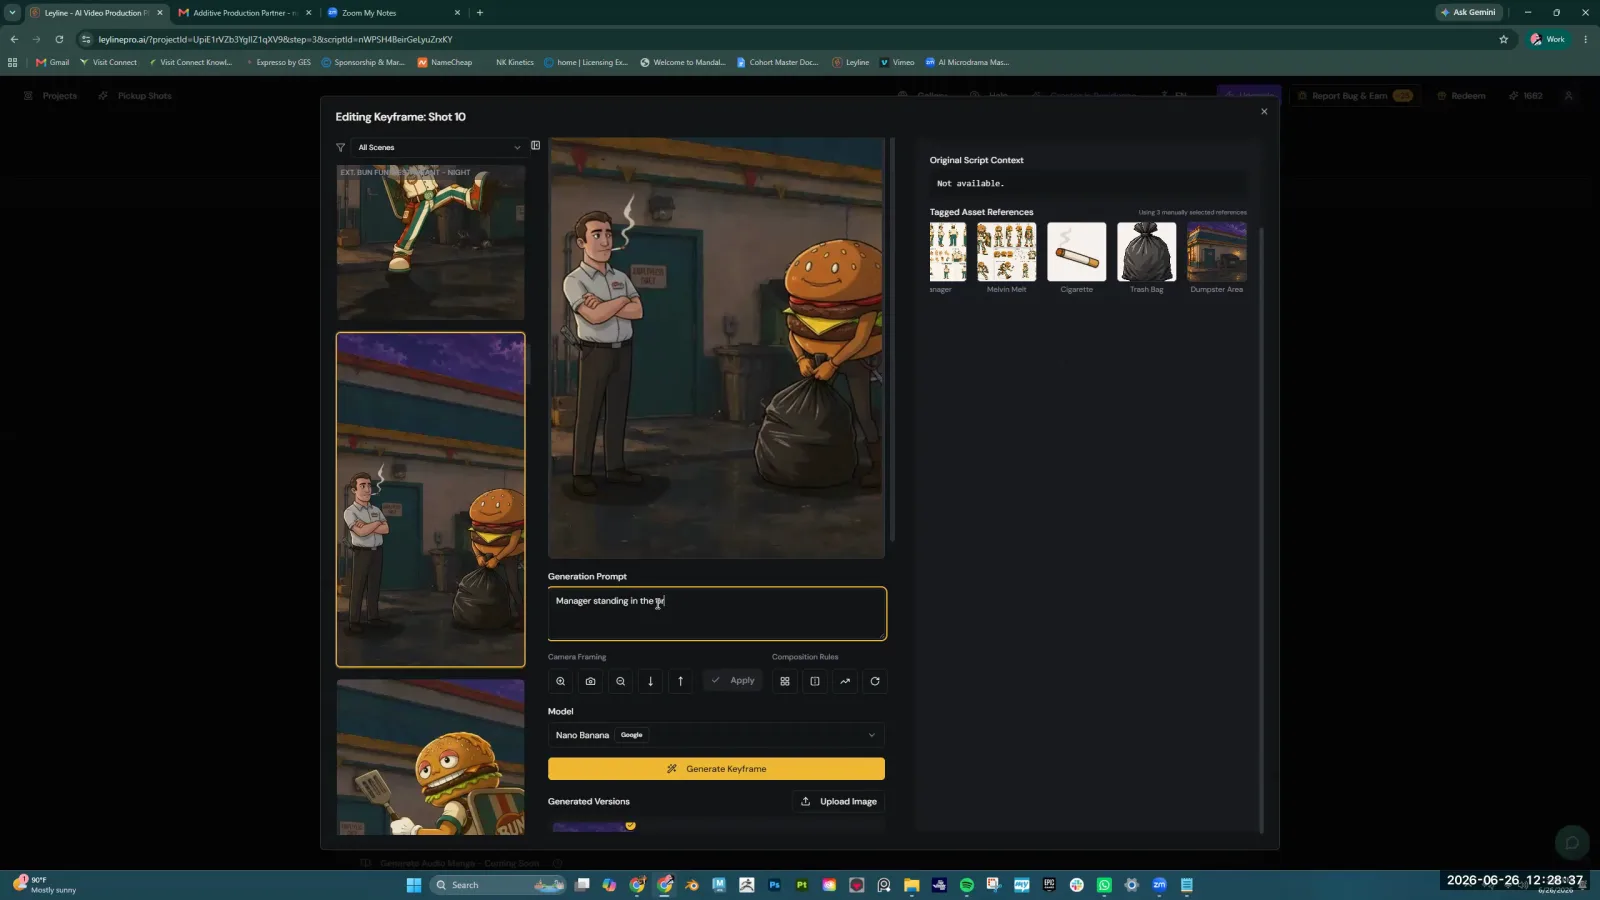
In the Generation Prompt box, expand on the simple prompt to add specific details about the characters, actions, and environment.
Step 3. Click on 'Manual Override' to control which assets are referenced.
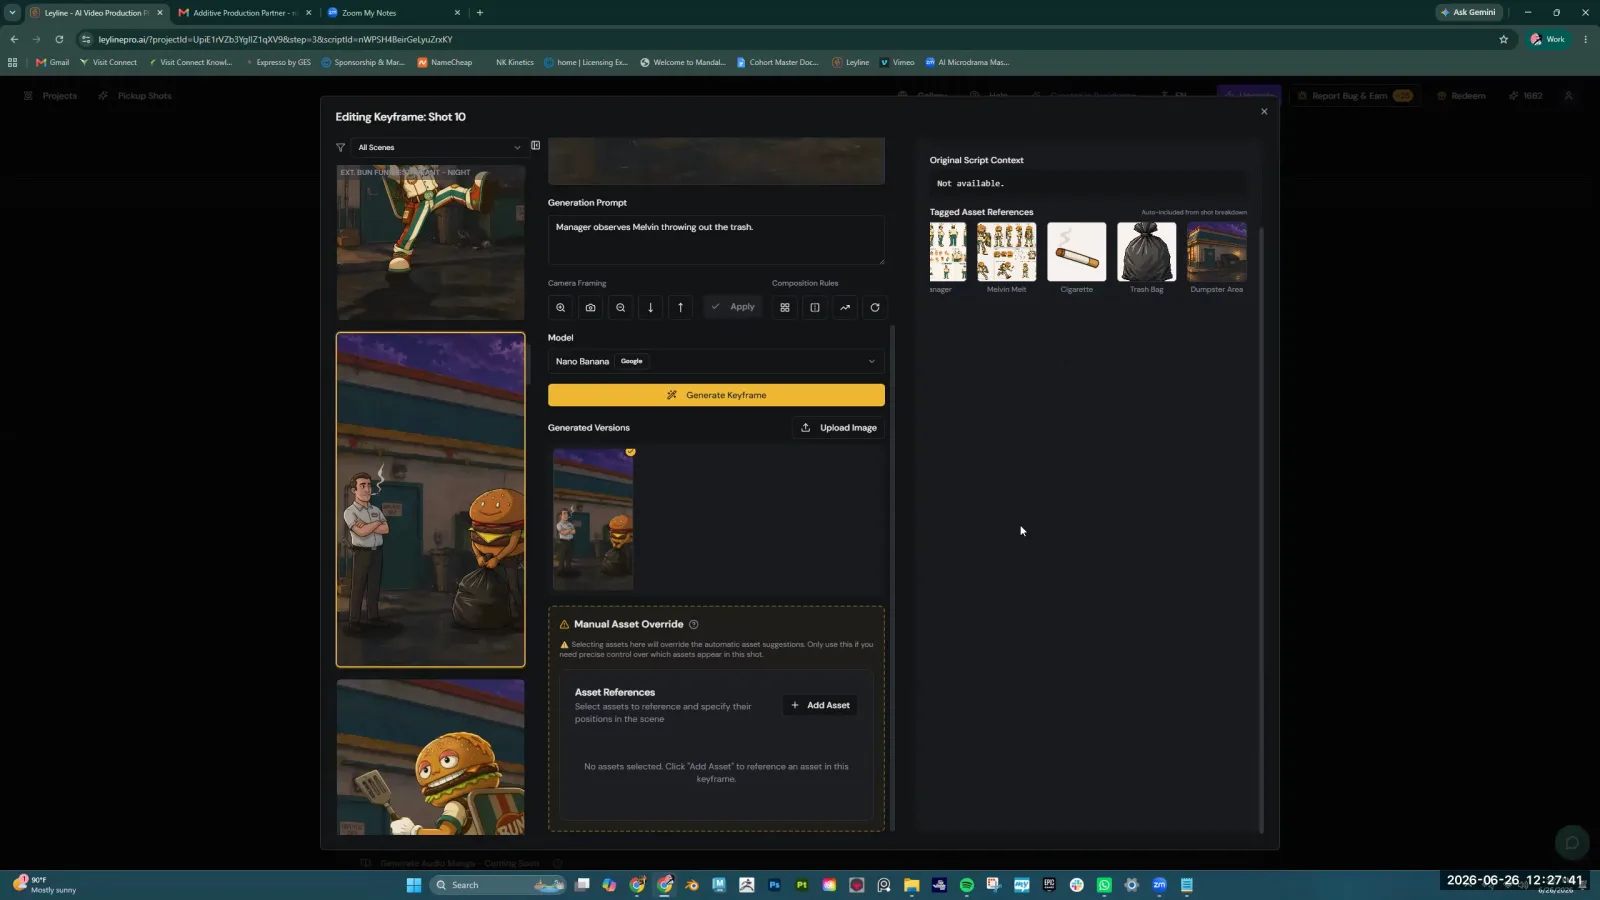
Use the 'Manual Asset Override' section to gain precise control over which assets are referenced in the shot.
Step 4. Select only the 2-3 most essential assets (e.g., one character, one location) for the shot to avoid confusing the AI.
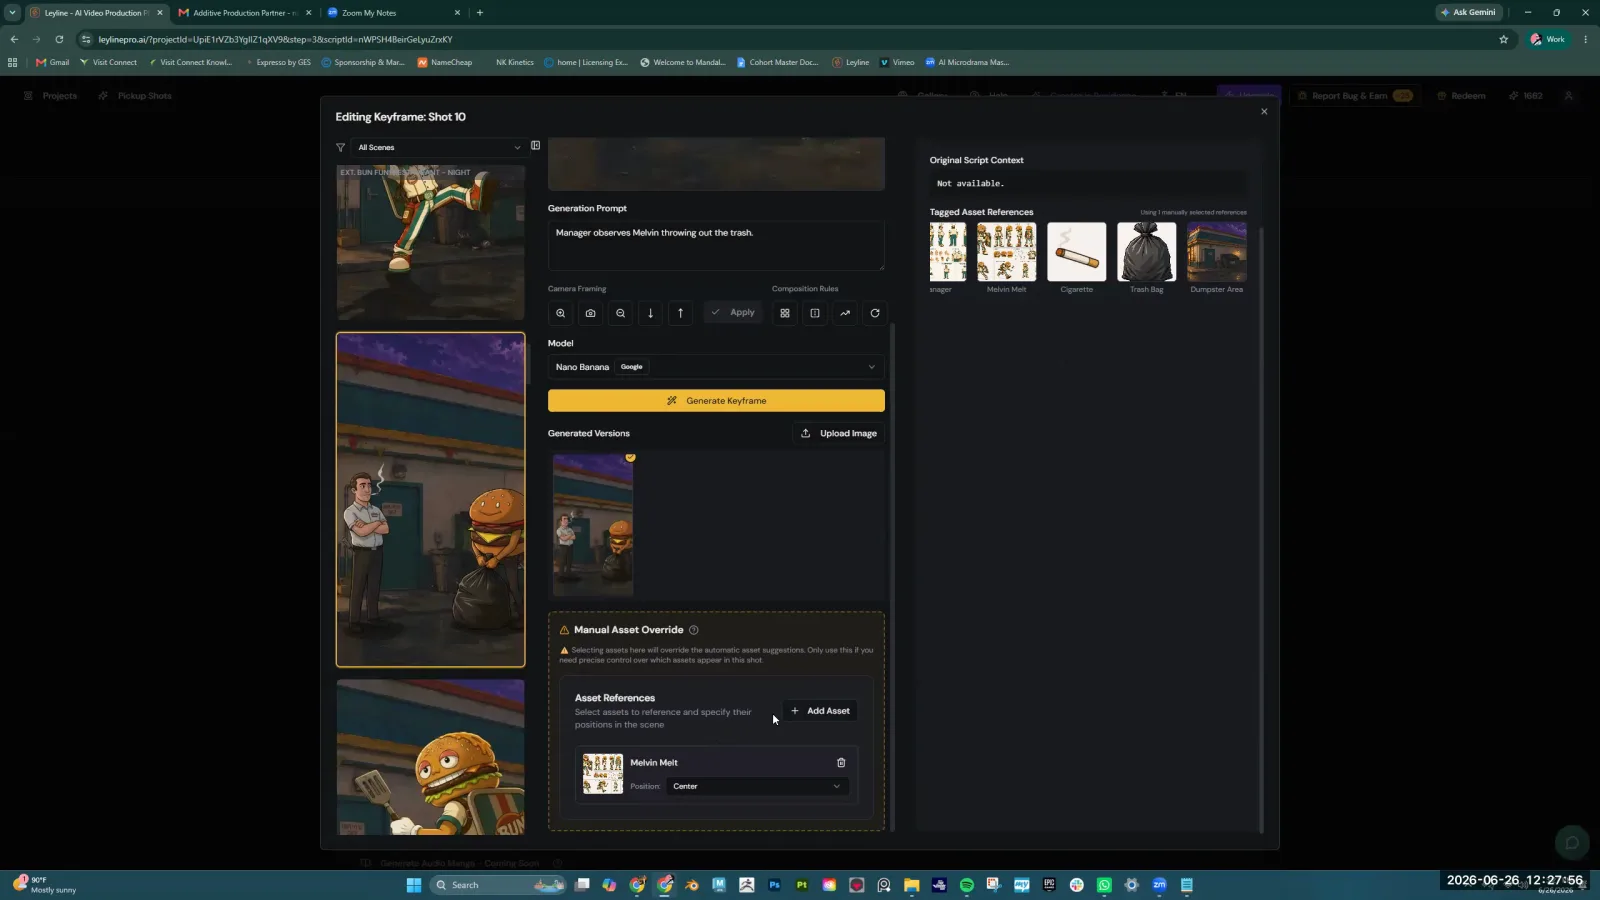
In the Asset References panel, manually select only the most essential assets to guide the AI's generation.
Step 5. Generate the keyframe again and repeat the process until you get a satisfactory result.
Reorder Shots in the Timeline
Before you render the final video, you may need to adjust the story's pacing, so follow this process to change the sequence of shots directly in the timeline.
Step 1. Navigate to the Keyframes section of your project.
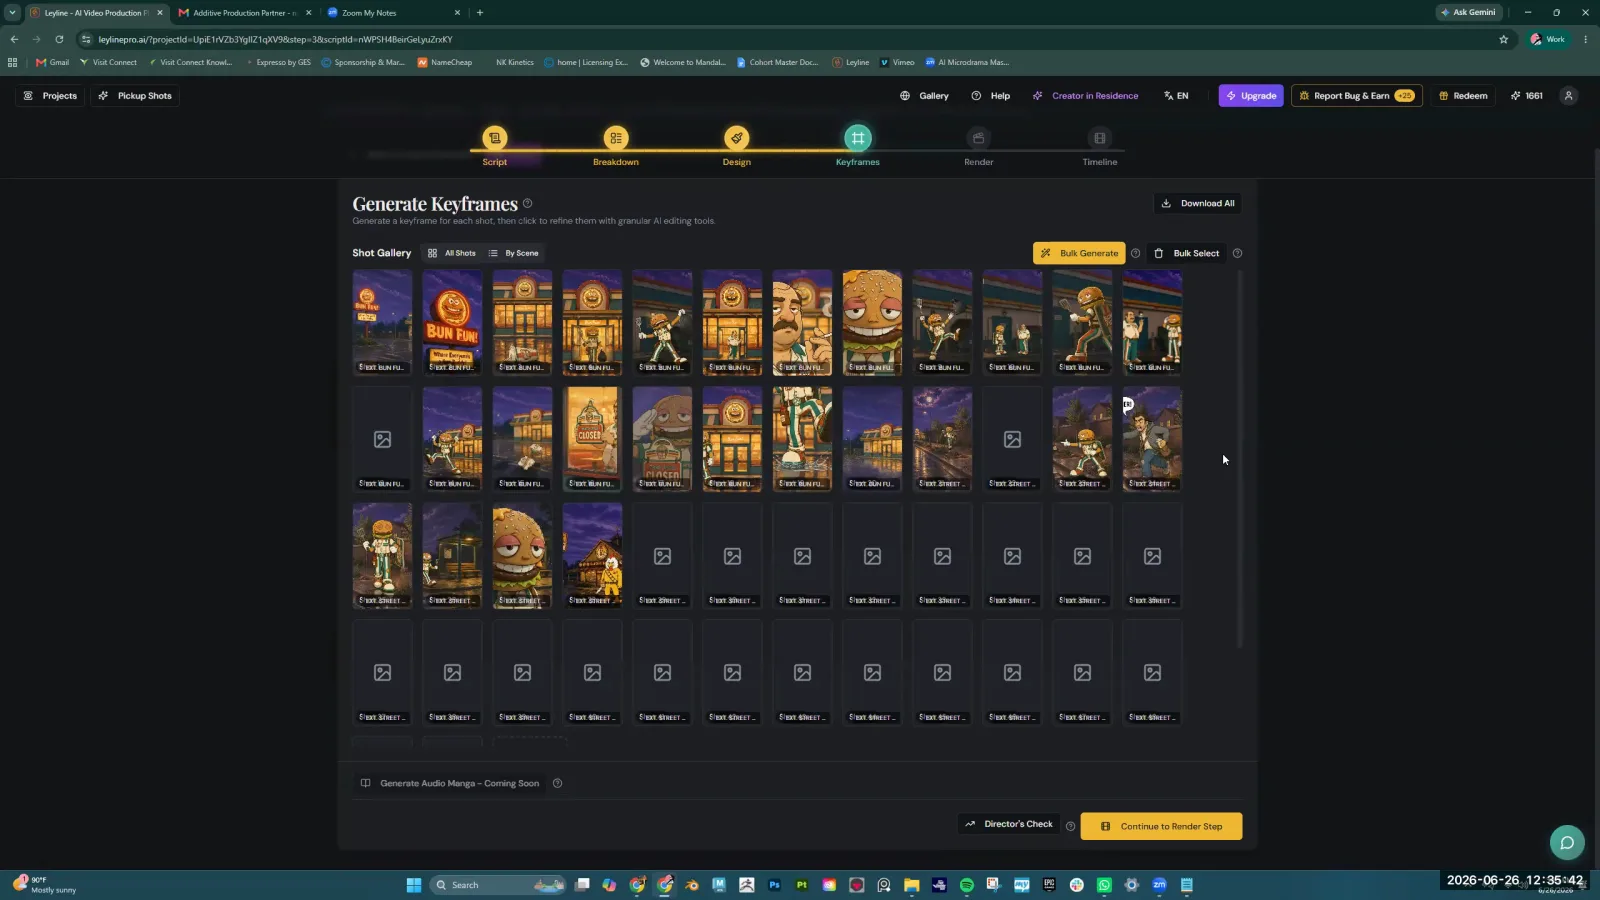
To organize your shots, select the 'By Scene' view in the Shot Gallery.
Step 2. Switch to the 'By Scene' view.
Step 3. Click and drag a shot to a new position in the sequence.
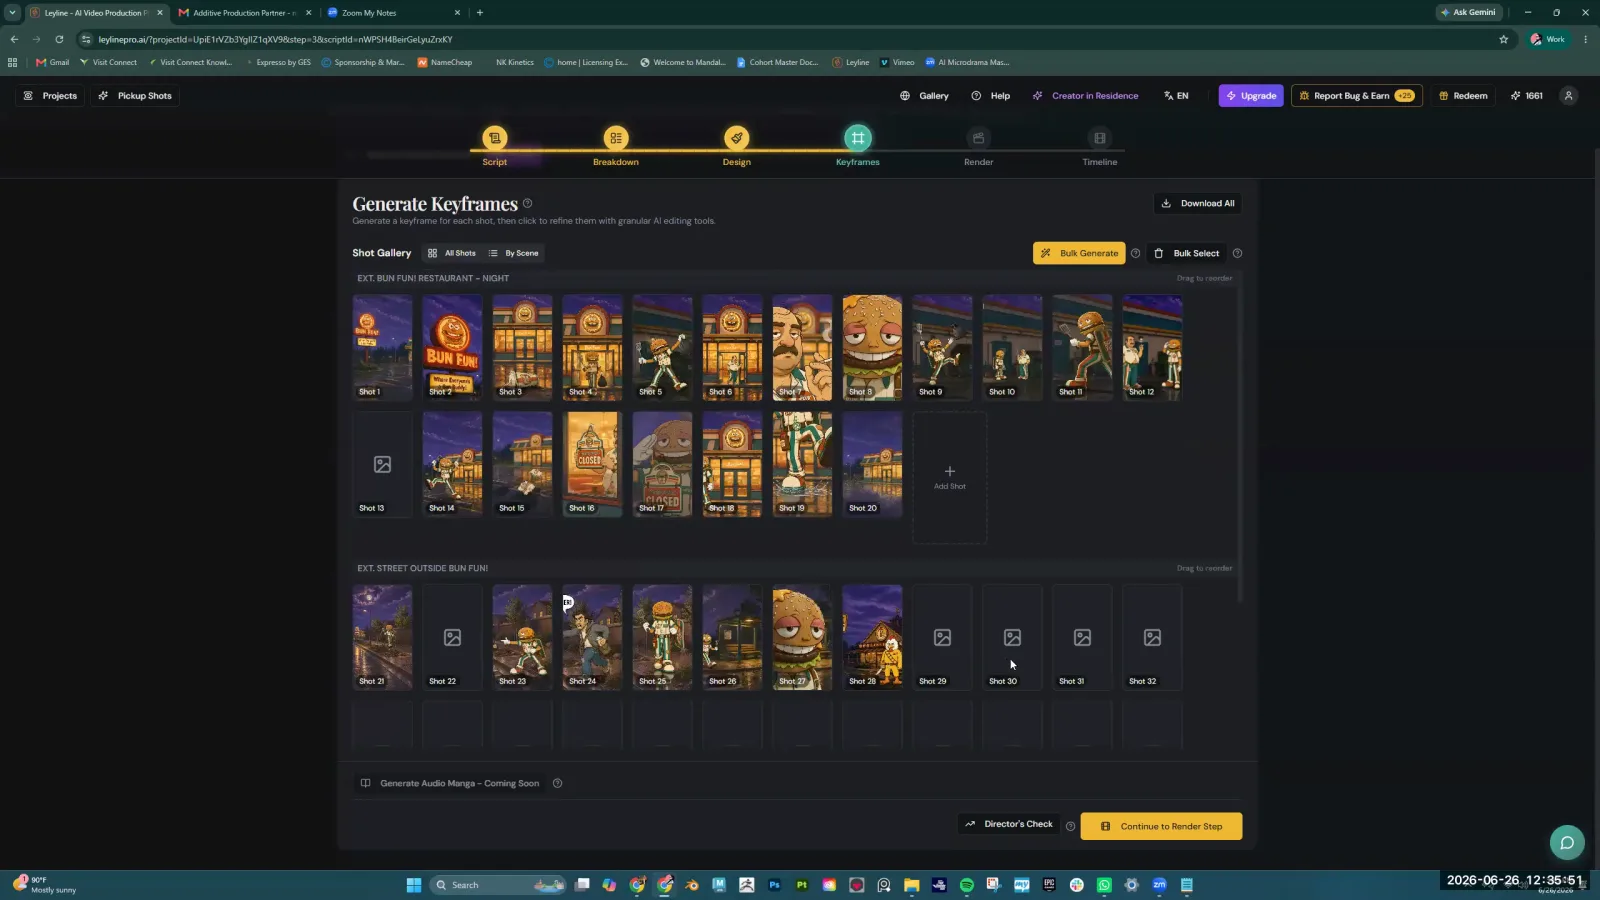
To reorder your story, simply click and drag a shot to a new spot in the timeline.
Step 4. Confirm the reorder when prompted. This will update the shot order in the script breakdown as well.
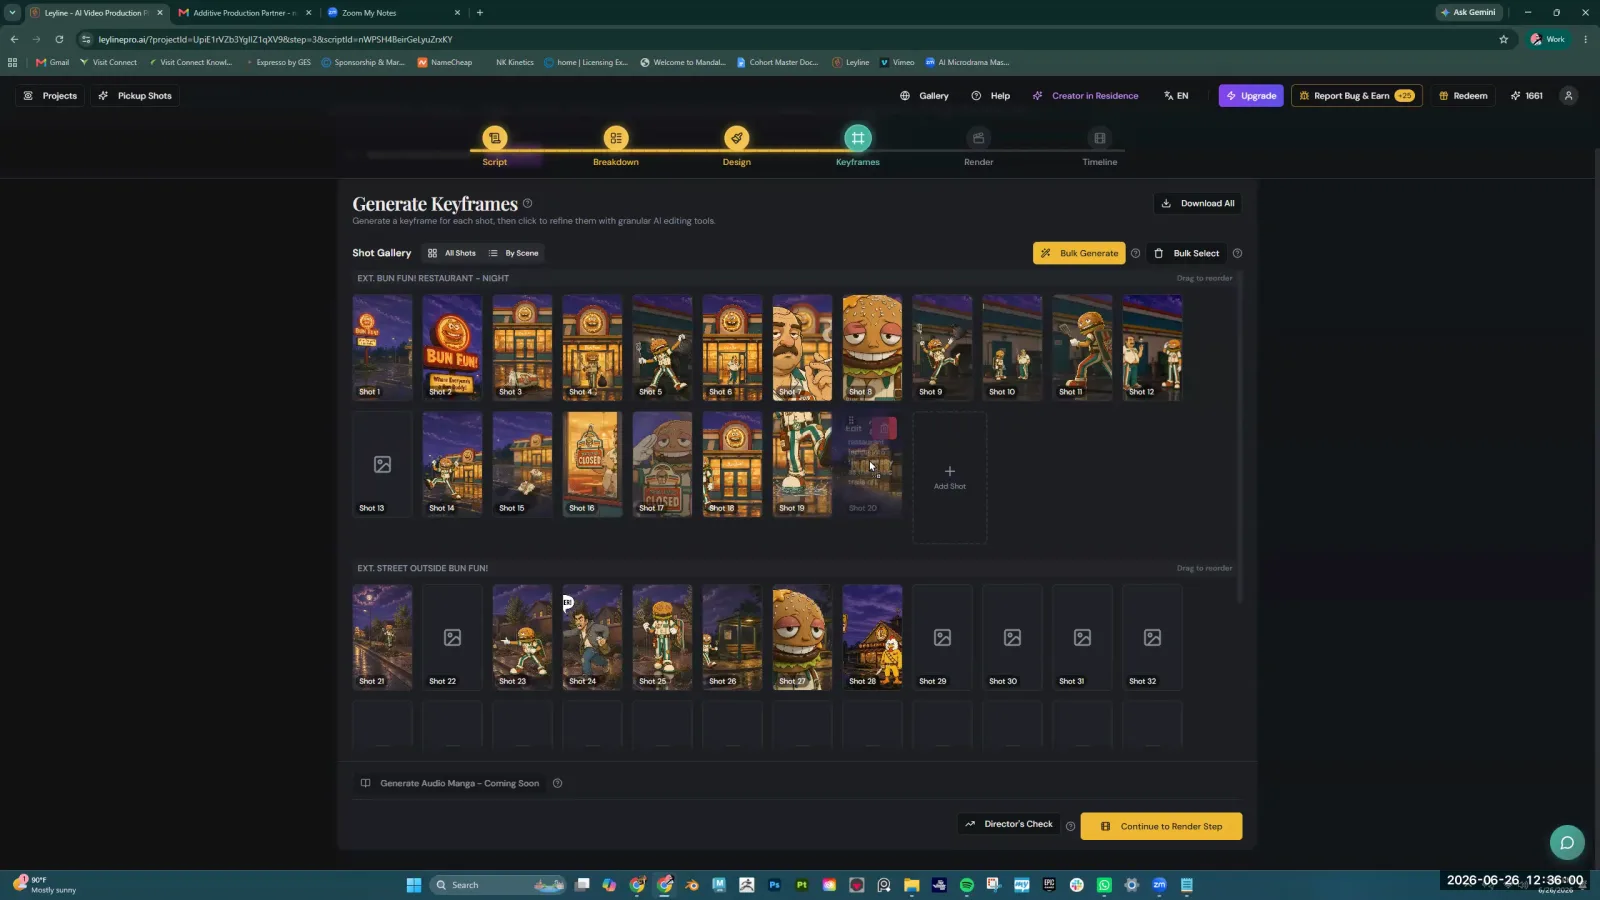
The shot gallery now reflects the new order of the shots, organized by scene.
Remove Unwanted Music from AI Video
AI video generators can add unwanted background music to clips, so this workflow explains how to use negative prompts to render video without any audio.
Step 1. When generating a video clip in the 'Render' stage, locate the 'Negative Prompts' input field.
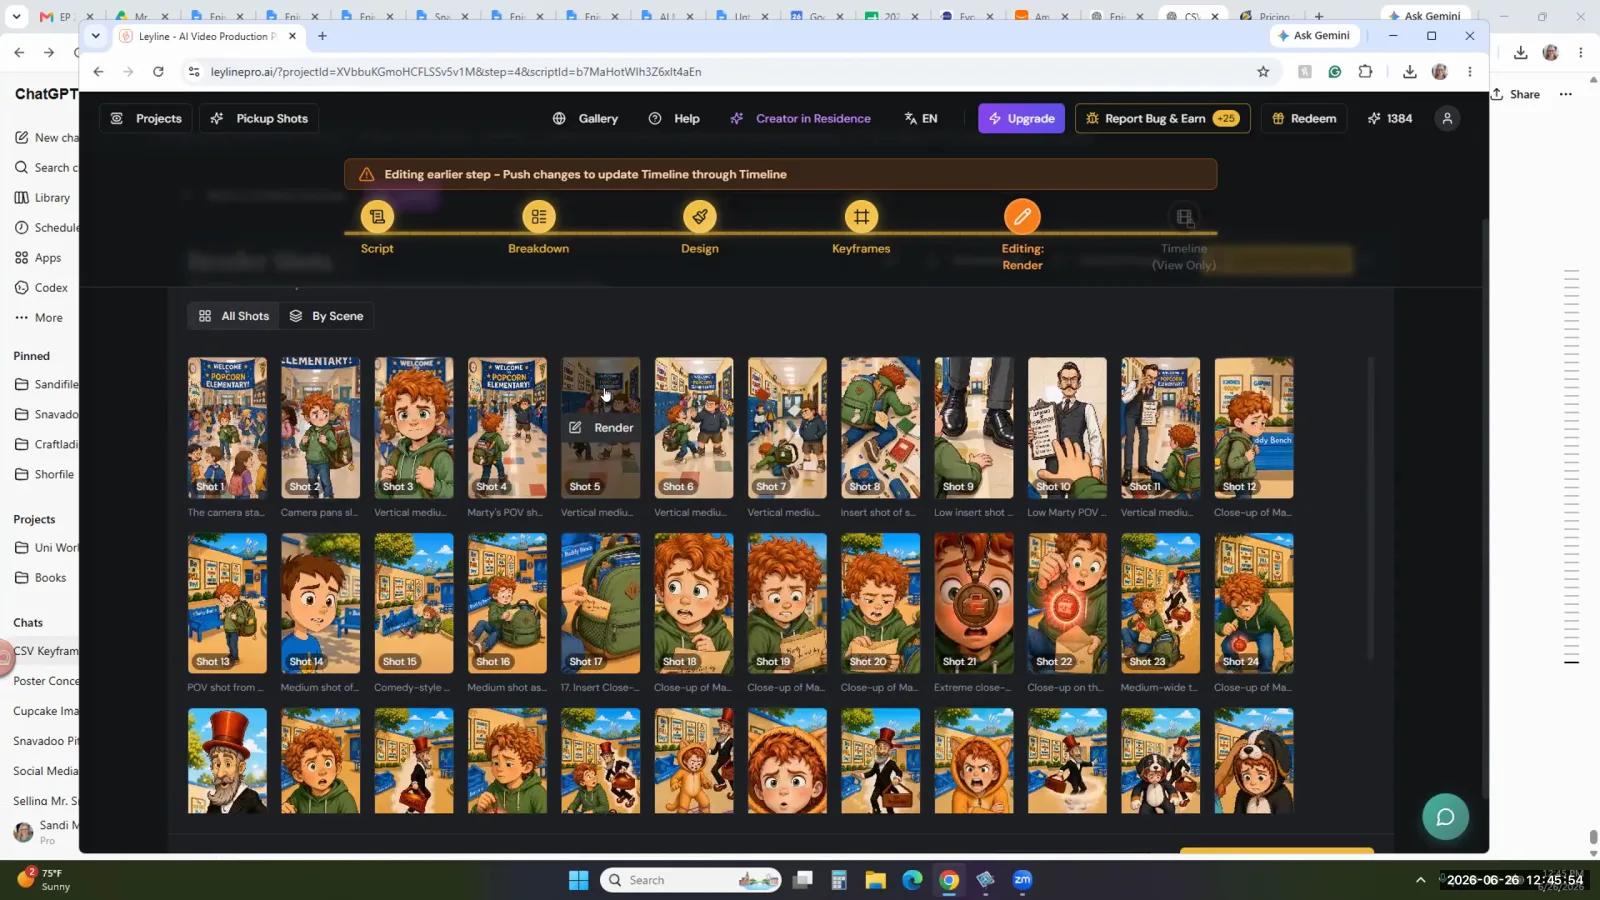
To access the render settings for a clip, hover over its storyboard panel and click 'Render'.
Step 2. Type 'no music' into the negative prompt field.
Step 3. Generate the video. The resulting clip should only contain sound effects or dialogue, without a musical score.
Key terms
Render Consistency Suggestions. An automated feature that suggests changes to improve consistency across shots, which may not always be accurate and should be evaluated with user judgment.
Timeline Preview. A feature that allows users to play back a sequence of their generated shots in a timeline to see how they flow together.
Timeline Duration. The total estimated length of the film based on the shots currently in the timeline.
Pickup Shots. A feature designed for generating a few additional, individual shots after the main rendering process, often using reference images to maintain consistency.
Script Breakdown. The process of breaking a script down into individual shots, each with its own description, characters, location, and estimated duration.
Theoretical Duration. The AI's estimation of a shot's length based on the text in the script breakdown, which may differ from the final generated clip's length.
Compiled Video. A single video file created by joining together multiple individual shots from the timeline. An incomplete compilation can result in a shorter-than-expected preview.
Video Masking. An editing feature within the platform to isolate and change parts of a video. The instructor notes it's an older, less reliable function.
Keyframe. A reference image that defines the starting point, style, and composition for an AI-generated video clip.
Multiple Draws. The practice of generating a shot multiple times to get the best possible result, as AI generation is not always perfect on the first try.
Video Generation Models. Different AI models available for video generation, such as V, C dance, and Cling, with some offering more controllability than others.
Design Assets. Reference images for characters, locations, and props that are used by the AI to maintain consistency throughout the project. Also referred to as the 'Bible'.
Manual Override. A feature in the keyframe generation step that allows the user to manually select which specific design assets to use as references, overriding the automatic selection.
Uprise. A term used to describe upscaling or enhancing a generated keyframe that the user has decided to use for the final rendering.
By Scene View. A specific view in the keyframe or timeline interface that groups shots by scene, which also allows for reordering shots via drag-and-drop.
Shot ID. A unique identifier for each shot in the project, which is included in the CSV export of the script breakdown.
CSV Upload/Download. The ability to export the script breakdown as a CSV file for external editing and then re-upload it to the project.
Aspect Ratio. The ratio of the width to the height of an image or screen. The project requires a consistent aspect ratio (e.g., 9:16 for vertical video) to be set at the project level.
Negative Prompting. The technique of providing the AI model with terms to exclude from the generation. For example, adding 'no music' to prevent the AI from adding a soundtrack to a video clip.
Audio Separation. The process of splitting a video's audio into separate tracks for dialogue, music, and sound effects using external editing software like Capcut or Premiere.
Common mistakes to avoid
- Blindly accepting the AI's consistency suggestions without using personal judgment.
- Using overly simple and under-detailed prompts for keyframe generation, leading to generic or incorrect images.
- Trying to use the platform's older video masking feature for complex fixes instead of re-generating the shot with a better keyframe.
- Generating a shot only once instead of doing multiple 'draws' to get the best possible version.
- Including too many reference assets in a single keyframe generation, which confuses the AI and leads to poor results.
- Not breaking down a single large location (like a restaurant) into smaller, more specific locations (e.g., 'restaurant corner', 'cashier') for better scene control.
- Accidentally changing the project's aspect ratio from 9:16 to 16:9, causing all subsequent generations to be in the wrong format.
- Forgetting to use negative prompts like 'no music' when rendering video, resulting in clips with inconsistent, unwanted soundtracks.
- Editing an exported CSV breakdown in a way that changes its format, preventing it from being re-uploaded correctly.
Frequently asked questions
How to fix inconsistent characters in AI-generated video?
To fix inconsistent characters, refine your keyframe prompts with more detail and manually select the correct character assets. Instead of accepting the first result, generate multiple 'draws' of each shot and choose the one with the best consistency. Avoid using too many reference assets, which can confuse the model.
My AI timeline preview isn't working, what should I do?
When the in-platform timeline previewer fails, the best workaround is to assemble the film externally. You can download all the individual video clips that have been generated for your project and then import them into a separate video editing program to create the final sequence.
How to generate extra shots for an AI film project?
To generate extra shots for a project, use the 'pickup shots' feature. This allows you to create a few additional video clips needed to complete a scene after you have already rendered the initial batch of shots from your script breakdown, helping you fill gaps in your story.
How to stop AI from adding music to video clips?
To prevent the AI from adding unwanted soundtracks, use negative prompting during video generation. By including a specific instruction like 'no music' in your prompt, you can direct the model to render the video clip without any background music, ensuring you only get the visuals you need.
Why did my AI video's aspect ratio change automatically?
The aspect ratio of your AI video likely changed because the project setting was accidentally modified. For example, a project might be unintentionally switched from a vertical 9:16 to a horizontal 16:9 format, causing all subsequent video generations to be created with the incorrect dimensions.
In the instructor’s words
“The AI is not quite there yet.”
“Not the whole clip is usable most of the time.”
“Unfortunately, a couple of draws really is needed for this.”
This tutorial was produced from the Leyline Masterclass recording (Cohort 9, Session 7, 2026-06-26). Screenshots are captured directly from the session.